Fujitsu PalmSecure Palm Scanner
- Robin Rodrigue
- Former user (Deleted)
- Former user (Deleted)
Fujitsu provides a highly reliable biometric authentication system based on palm vein pattern recognition technology. PalmSecure™ features industry-leading authentication accuracy with extremely low false rates, and non-intrusive and contactless reader device provides ease of use with virtually no physiological restriction for all users. The Fujitsu PalmSecure sensor uses near-infrared light to capture a person's palm vein pattern, generating a unique biometric template that is matched against pre-registered user palm vein patterns. The palm vein device can only recognize the pattern if the blood is actively flowing within the individual's veins, which means that forgery is virtually impossible. Fujitsu™
For more information contact MCS Software - Sales.
In order to enroll students using the palm scanner, please refer to the Palm Scanning Enrollment section of this page. There is also an additional Palm Scanner Enrollment Video to enhance the written documentation.

Features
- Advanced biometric authentication algorithm delivers ultra-low FAR (false accept rate) and FRR (false reject rate)
- Contactless palm vein authentication is hygienic and noninvasive - No Residual Trace Technology
- Encrypted repository for template storage & enterprise level event logging capability
- PalmSecure Authentication recognized by leading International Security Bodies, including International Common Criteria and CNIL Speed and Extensibility
- Quick-start deployment across the enterprise raises security and adds value
- SDK (Software Development Kit) for organizations deploying PalmSecure technology
- Fast and easy registration with virtually no enrollment error
- Biometric integration for third party Single Sign-On (SSO) solutions with PalmSecure LOGONDIRECTOR
For those concerned with latex allergies, the Fujitsu Palm Scanner contains no latex products in the hand guide. The material is Polycarbonate/Acrylonitrile Butadiene Styrene (PC/ABS), a commonly used plastic.
Technical Specs
| Supply voltage (from USB power) | 4.4 to 5.4V (Input current: up to 500mA) |
| Reliability | MTBF (mean time between failure):830,000 hours for sensor only. 250,000 hours for controller only |
| FAR (false accept rate) | 0.00008% |
| Sensor surface material | Glass |
| Palm Capture Distance | 2 inches from the surface of the sensor (+/- .5 inch) |
| Outer dimensions (sensor only) | 1.37(W) x 1.37(D) x 1.06(H) inches |
| Supported OS | Client: Windows® 7, XP Pro, Vista, Redhat Linux Ver. 5 Server: Windows Server 2003 and 2008, Redhat Linux Ver. 5 |
| Power consumption | 2.5W or less |
| Authentication response time | Less than 1 second |
| FRR (false reject rate) | 0.01% |
| Acoustic Noise | None |
| Operating Temperature | 0°C to 60°C |
| Hand Guide Material | Polycarbonate/Acrylonitrile Butadiene Styrene (PC/ABS) |
Installation & Setup
In order to install devices, you must have Administrator permissions.
Do not plug in the device until instructed to do so.
 If you are installing a palm scanner on a Windows 8 or above operating system, you must have latest M3 sensor with V2 indicated on the bottom of the device.
Drivers should be installed on the machine using the device.
- Only one hand guide setting will operate on one POS terminal. Attempts to run both the Child Hand Guide and the Big Hand Guide on the same terminal will result in an error.
- You must have the correct driver installed on the POS terminal. Installing both drivers will result in an error.
- Once a student/customer has been registered on one device, they must continue to use the same device. The other device will not recognize the student/customer. (e.g. Line 1 has the Big Hand Guide installed. Line 2 has the Child Hand Guide installed. John Doe was registered on Line 1. John must continue to use Line 1 for meals served. If he uses Line 2, his palm will not be recognized.)
- Ensure that you have established device settings correctly for each serving line.
- Login to the Customer Portal and select Download Software from the Common Links section.
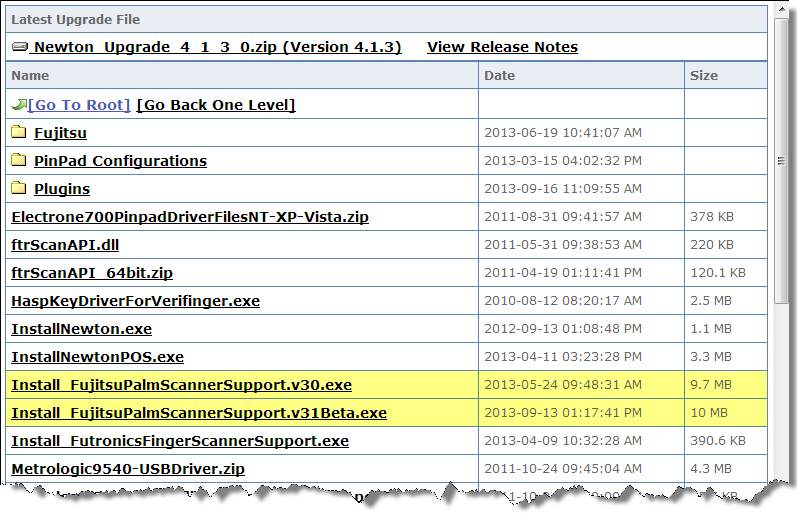
- Locate and click on the Newton folder to open it.

Select the Install_FujitsuPalmScannerSupport.v30.exe file or the Install_FujitsuPalmScannerSupport.v31Beta.exe file.
It is important that you download the correct file.
- Everyone using the large black hand guides will select the .v30 file.
- If you are using child hand guides—small guides with red backing—or want to use two palm scanners on the same serving line, you will need to select the .v31Beta file.
You may choose individual .v30 or .v31Beta driver files for each school location; however, one school cannot have two different driver files installed in that school accessing both .v30 and .v31Beta files. You must choose one .v driver file for each school location.
Warning: Currently, the .v31Beta file will only properly support cafeterias that host a student population of 1,000 students or fewer. If you have a student population that is greater than 1,000 students, MCS recommends using the .v30 file and not utilizing duel scanners or child hand guides.
- Locate the file if it was downloaded. In the Open File-SecurityWarning window, choose Run at the prompt.

- It is recommended that all other applications are closed before proceeding. Click Next on the following Palm Scanner Support Wizard window.

- Select the software components to install. Then, click Next.

- Once the installation process is complete, click Next.

- When you reach the final window, select the Launch Driver Installation option and click Finish to begin the driver installation.

- Select a setup language. Then, click Next.

In the Fujitsu PalmScanner Sensor Driver Setup window, click Next to begin installing the sensor driver.
If you receive a Windows Logo Testing warning, select Continue Anyway.

- Click Finish once the installation is complete.

- It is recommended that all other applications are closed before proceeding. Click Next on the following Palm Scanner Support Wizard window.
- Connect the palm scanning device.
- Establish Serving Line configurations
- Login to Newton.
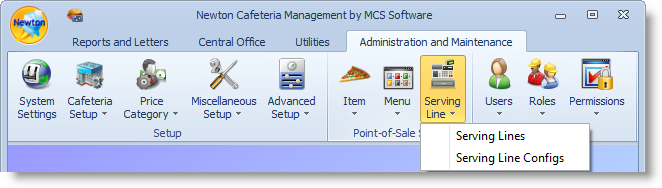
- Locate and click on the Administration and Maintenance tab.
- Locate the Serving Line option in the Point-of-Sale Setup ribbon.
- Click on the Serving Line option.
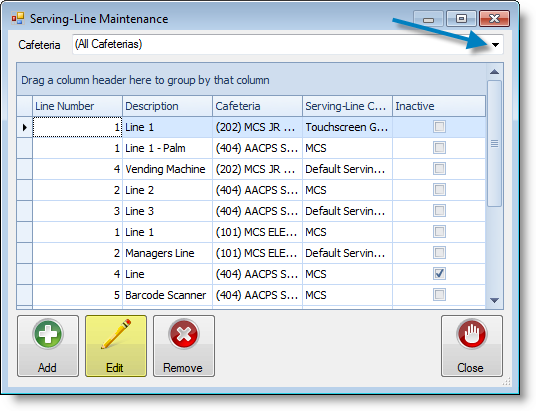
- In the Serving-Line Maintenance window, select a cafeteria line by clicking on a row or using the drop-down arrow and click the Edit button. If you use the drop-down arrow, be sure to select the proper serving line to install the device.
- Click on the Override Settings tab.
- Scroll down and locate the Devices section in the parameters.
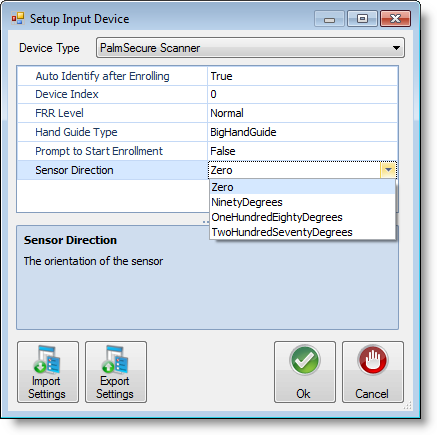
- Once you have located the Devices section click on Customer Input Device #1, then the ellipsis button.
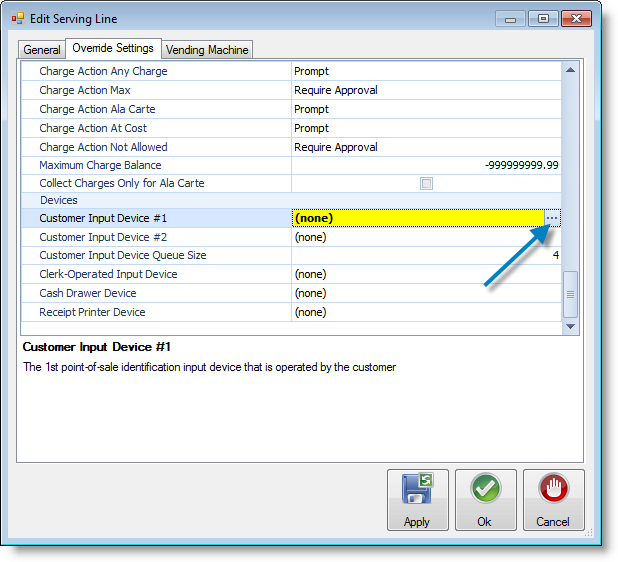
- Use the drop-down arrow to locate and select the PalmSecure Scanner.

- Establish line setting by using the drop-down arrows.
- Auto Identify after Enrolling - Allows the line operator to continue with serving a meal as soon as a student's identification has been successfully established.
- Device Index - The device index typically remains at 0.
- FRR Level - False Rejection Rate Level establishes sensitivity when completing scanning.
- Hand Guide Type - By default, the guide type is set for the Big Hand Guide. If you are using the smaller hand guide or have younger students, the type should be changed to ChildHandGuide.
Prompt to Start Enrollment - Allows the line operator to choose when to begin the enrollment process.
MCS highly recommends setting the Prompt to Start Enrollment option to True for elementary schools. Younger children tend to be reluctant about placing their hand on the guide device. With the Prompt to Start Enrollment option is set to false and the nervousness of the younger children, the children have a tendency to slowly place their hand on the device. This results in only a partial capture of the child's palm.
- Sensor Direction - Chooses the direction of the sensor.
- Click Ok when you have completed adjusting the settings.
- Click Ok again to exit out of the Edit Serving Line window.
- Click Close in the Serving-Line Maintenance window.
- Exit out of Newton. Then, log back in to Newton for all the device settings to take effect.
- Test the palm scanning device.
Test the palm scanning device by starting a new meal. Ensure Newton is recognizing meals served in the system.
Enrollment & Usage
 Make sure the scanner has been completely configured for the line you are enrolling on before beginning the process.
For additional instruction on enrolling students using the palm scanner, you can view the Palm Scanner Videos.
- Login to Newton (Back Office) from the main machine and start an operating day by clicking the Start Operating Day link on the checklist.

- Start a meal (either breakfast or lunch) by clicking Start Meal (Lunch) or Start Meal (Breakfast) link on the checklist.

- Ensure the date is correct on the Meal Calendar screen and click Ok.

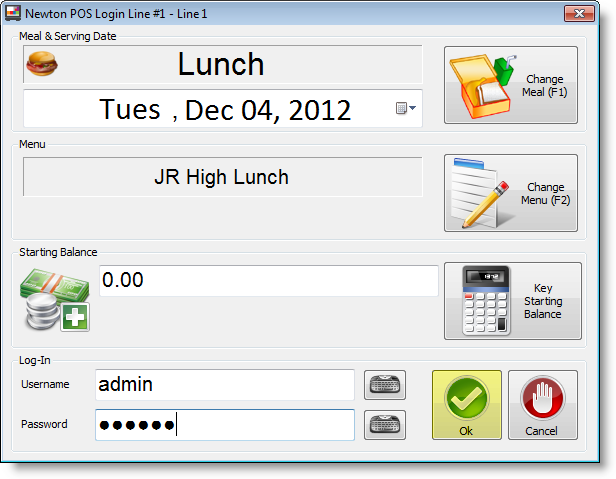
On the POS serving line with the Palm Scanner, double click on the Newton POS icon to open up to the login screen.
 If you will be enrolling students on the main machine, locate the Meal Control Panel and click on Main Machine to run Newton POS.
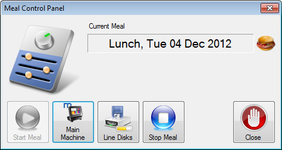
- Login to Newton POS by entering the username and password given to you by the system administrator, then click Ok.
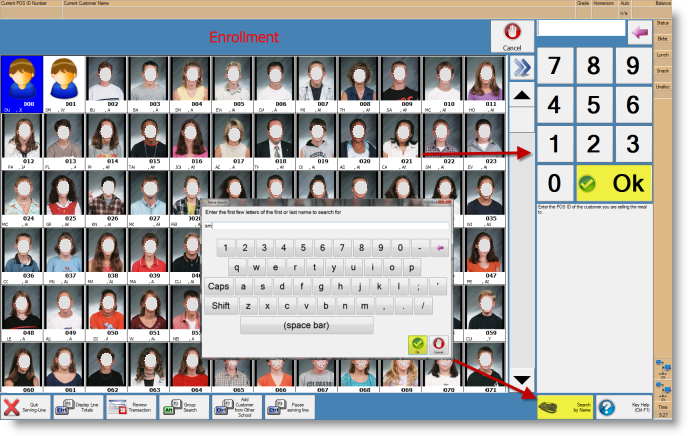
- In the Customer Input Device window, begin enrolling students by clicking the Enroll button.

- The Student Selection screen will appear with the word Enrollmentblinking red at the top of the screen.
- If using a standard keyboard, begin typing either the name or POS ID number to search for the student being enrolled.
- If the machine is a touch screen use the onscreen number pad to search by POS ID number or onscreen keyboard to search by student name. (The onscreen keyboard will appear by clicking the Search By Name button.
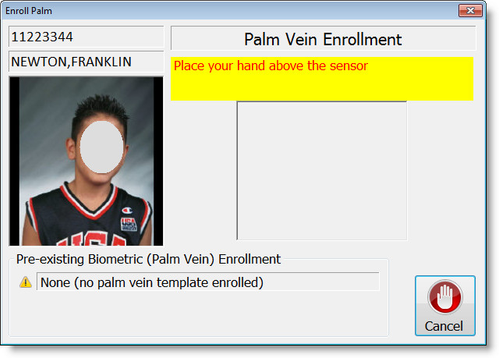
- Once you have selected the student, the Enroll Palm screen will appear. The onscreen instructions will guide you through the enrollment process.

Place the student's hand, fingers spread open, all the way to the top of the palm guide so that the middle finger is in between the two finger dividers at the top of the guard. The webbing between the index and middle finger and the middle, right ring-finger should be touching the two finger dividers with the palm flat down. The object is to let as little light in as possible, so the infrared scanner can read the veins.
Best PracticesIMPORTANT! It is recommended that all students are enrolled using the right hand to maintain consistency. This helps the user always know which hand was used for enrollment in case the student forgets.
Correct Hand Placement
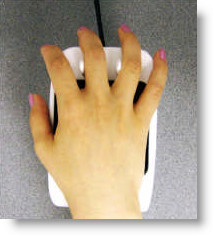
 Incorrect Hand Placement
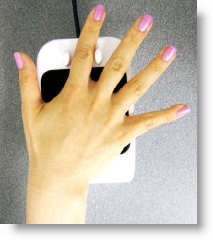
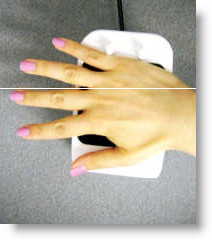
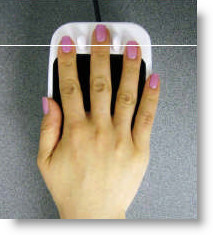
Enroll the student.
The enrollment process requires two (2) good scans in order to make a positive match.
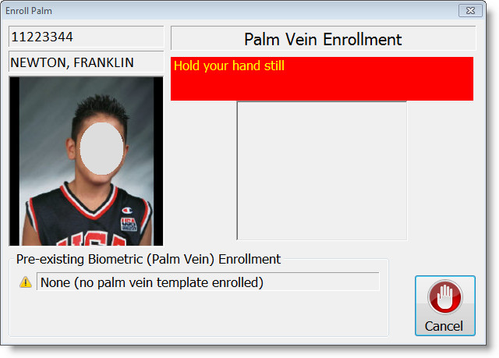
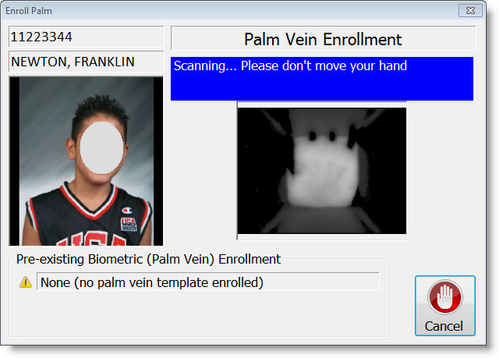
The student will place their hand on the scanner and follow the onscreen instructions. The first scan will direct you to place the students hand on the scanner, hold it still, and then move the hand away. The second scan will require the student to place their hand back on the scanner and hold still. The student screen will turn green once both good scans are accepted. The following screen shots will show the entire process:

When the enrollment process is successful the system will automatically go back to the Customer Input Device screen. The background color of the screen will now be green acknowledging an identified student. Click the Skip button to continue enrolling more students or enter to continue with normal serving line processes.

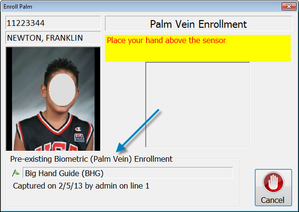
To view biometric enrollment information, select the student and click the Enroll button. Pre-existing biometric data details are located at the bottom of the window.
- Biometric device
- Date of capture
- User who captured data
- Location of capture
- The Customer Input Device screen will again turn red and the Enroll button will now be accessible. Click the Enroll button to continue the enrollment process.

- When the enrollment process is complete, you can click the Search button on the Customer Input Device screen to return to the Student Selection screen.

After you have finished with line servings, click the Quit Serving Line button to exit Newton POS.
Then, click the Exit Point-Of-Sale button.
Be sure to return to the main machine and stop the meal and post transactions for the day.