Item
- Robin Rodrigue
- Nora Kinal
Items are conceptually the smallest unit sold on the Point of Sale line. Often times, multiple articles will be consolidated into a reimbursable meal unit and sold as an item. The Items option contains all items sold within the District.
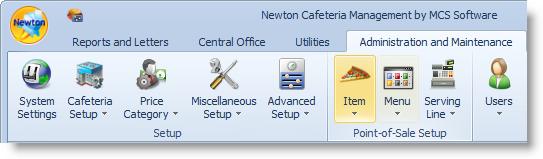
Locate and click on the Administration and Maintenance tab. Next, click on the Item.
Items
In the Items section, you can maintain descriptions, categories, select offer versus serve, prices, price overrides, item statuses, item components, and allergens.
- From the Administration and Maintenance tab, select Item. Then, choose Items.
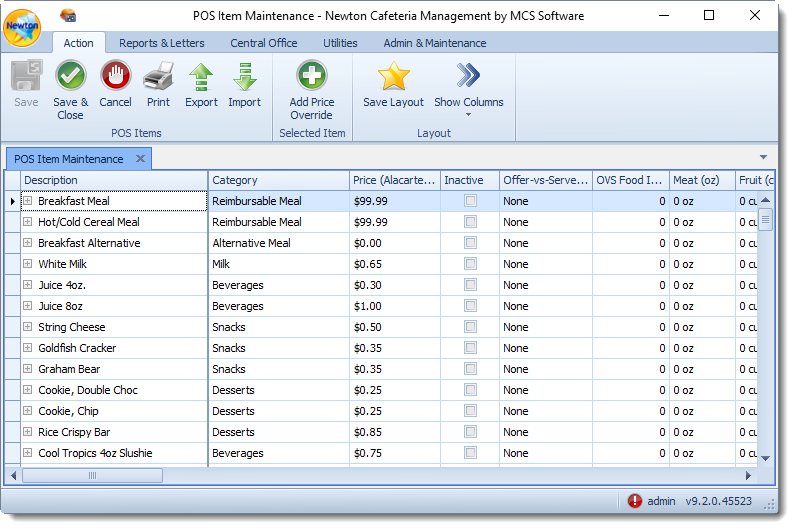
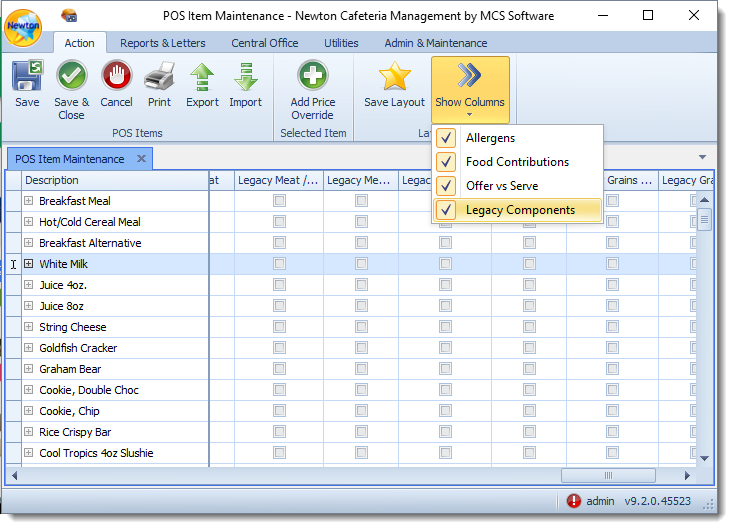
To create a new Item, scroll to the bottom of your item list and enter it in the blank space next to the asterisk *. Use the scroll bar at the bottom of the screen to establish item criteria. You can choose which columns to show or hide by selecting from the Show Columns drop-down menu at the top of the screen.
Establish item details. After you have completed entering information for all items, click Ok.
USDA Standards
It is the District's responsibility to comply with USDA standards in order to meet the requirements for claim purposes.
Save Layout
Save Layout gives you the ability to customize the layout you use most often. Reorder and hide columns. Then, click Save Layout. Once you close and reopen Items, your custom layout will appear.
To return to the default layout, click the Newton icon → My Profile → Reset Local Settings.- Description - Enter a description of the Item.
Category - Categories are first established in Item Categories. The category will allow you to sort items for easier viewing. Use the drop-down arrow and choose a category. In order for an item to be included in the claim, it must be established in one of two ways:
-The item category is established as a Reimbursable Meal. Any additional categories are considered à la carte/at cost.
-The item category can be established as Milk, Grain, entree/main, fruit/side, or vegetable/side when utilizing the new OVS Food-Based option to meet meal components requirements.You may also setup á la carte item categories. Remember that those items are not considered part of a reimbursable meal.
- Price (Alacarte/At Cost) - Enter the à la carte/at cost price. The à la carte/at cost price will be charged for an item, once the reimbursable meal has been sold.
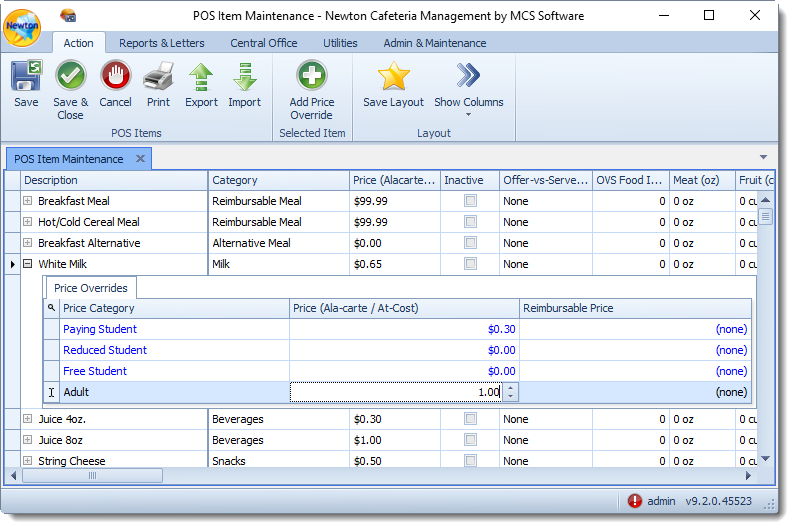
- Add Price Override (if applicable) - Select an item and click the Add Price Override button. Use the drop-down arrow to select a price category. Then, enter the Price (Ala-carte/At-Cost) and/or Reimbursable Price charged for the item.
Inactive - If an item is no longer offered, click in the inactive box.
Offer-vs-Serve Type - Use the drop-down arrow to select the type.
Offer versus Serve can be based upon an item or item component. If using offer-vs-serve, the item Category may not be established as a Reimbursable Meal and should instead be established as Entree, Vegetable, Fruit, Milk, etc. Offer versus serve items must have item components established to ensure USDA meal component requirements are fulfilled for reimbursement purposes. Once a "meal" has met all components, the à la carte/at cost price will be charged for an item.
None - The item does not fit another type (e.g. candy bar).
Entrèe - The item is classified as the main meal component (e.g. hamburger on bun or turkey sub).
Milk - The item is a consumable milk.
Side (only 1) - The item is a side item and only one item may be taken (e.g. fruit cup).
Side (2+) - The item is a side item and two or more of the item may be taken by the student (e.g. The student may take one green bean and one corn or two green beans).OVS Food Item Count - Enter the number of food item counts to establish that an item or component meets USDA reimbursable meal requirements. Food Item Counts work in conjunction with Meat (oz), Fruit (cups), Vegetables (cups), and Grains (oz).
- Meat (oz) - Use the drop-down menu to select the number of ounces of meat in the item.
- Fruit (cups) - Use the drop-down menu to select the number of cups of fruit in the item.
- Vegetables (cups) - Use the drop-down menu to select the number of cups of vegetables in the item.
- Grains (oz) - Use the drop-down menu to select the number of ounces of grains in the item.
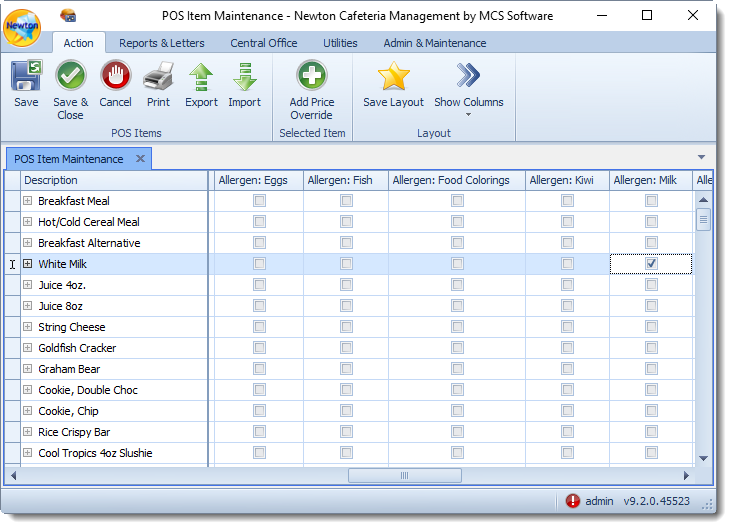
Allergens - Establish Allergens by placing a check mark in the appropriate column. Common allergens are added by default into the system. You may choose to add additional allergens.
- Apple
- Aspartame
- Bananas
- BHT/BHA
- Celery
- Corn
- Eggs
- Fish
- Food Colorings
- Kiwi
- Milk
- MSG
- Peanuts
- Preservatives
- Rice
- Sesame
- Shellfish
- Soy
- Tree Nuts
- Wheat
Item Components - Establish Item Components by placing a check mark in the appropriate column. Item components go hand-in-hand with the offer-vs-serve option to establish that an item or component meets USDA reimbursable meal requirements.
Legacy Offer versus Serve can be based upon an item or item component. If using offer-vs-serve, the item Category may not be established as a Reimbursable Meal and should instead be established as Entree, Vegetable, Fruit, Milk, etc. Offer versus serve items must have item components established to ensure USDA meal component requirements are fulfilled for reimbursement purposes. Once a "meal" has met all components, the à la carte/at cost price will be charged for an item.
- Legacy Meat/Meat Alt #1
- Legacy Meat/Meat Alt #2
- Legacy Fruits/Veges #1
- Legacy Fruits/Veges #2
- Legacy Grains/Breads #1
- Legacy Grains/Breads #2
- Legacy Milk
You may also choose to print a list of all items by clicking the Print button at the top of the page.
POS Item Export
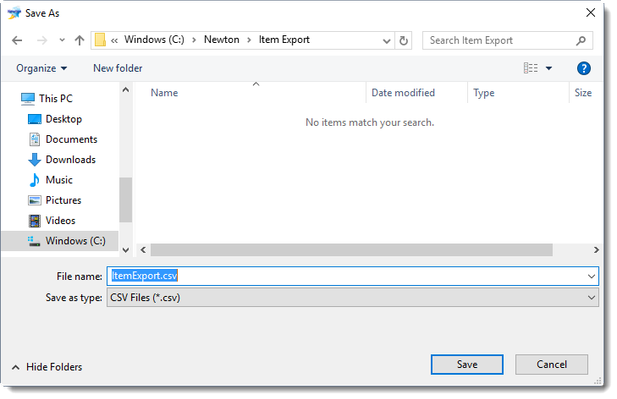
POS Item Export lets you export your items to a .csv file.
- From the Administration and Maintenance tab, select Item. Then, choose Items.
- Select Export.

- Choose a location to save the .csv file on your computer.
POS Item Import
POS Item Import lets you import items into Newton with a .csv file.
- From the Administration and Maintenance tab, select Item. Then, choose Items.
- Select Import.

- Browse to the location of your POS Item Import file. Select the file, then click Open.

- Items generated by the import will be highlighted in blue at the bottom of the page to indicate that they have not yet been saved. Click Save and Close when finished.
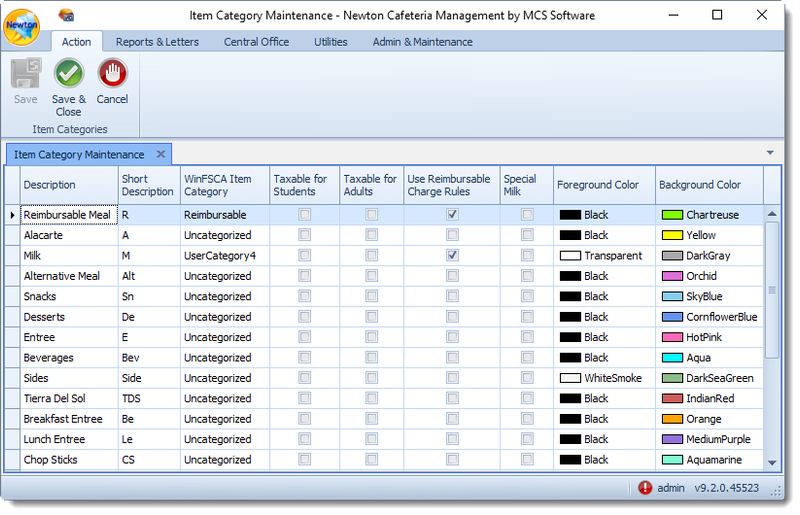
Item Categories
Item Categories factor into items sold during Point of Sale. Item categories can be designated as taxable (students and/or adults), reimbursable charge rules can be applied, and colors can be modified to assist in determining if all meal components have been met.
- From the Administration and Maintenance tab, select Item. Then, choose Item Categories.
- Establish Item Category criteria. Then, click Ok.
Description - Enter a full description of the item category.
You may click on the User Category # description and enter a description. To create a new category, scroll to the bottom of your item list and enter it in the blank space next to the asterisk *.
- Short Description - Enter a summarized description or other characters to denote the full description.
- WinFSCA Item Category - Use the drop-down arrow to select an item category established in WinFSCA.
- Taxable for Students - Place a check mark in the column if your state applies sales tax to student meals.
- Taxable for Adults - Place a check mark in the column if your state applies tax to non-student meals.
- Use Reimbursable Charge Rules - Place a check mark in the column if reimbursable charge rules apply.
- Special Milk - Place a checkmark in the column if the SMP program is applied.
- Foreground Color - Use the drop-down arrow to select from a list of colors in which text will appear in the POS serving line.
Background Color - Use the drop-down arrow to select from a list of colors in which the background/box will appear in the POS serving line.
You will be able to review foreground and background colors in the Menus options.