Serving Line
- Robin Rodrigue
- Nora Kinal
The Serving Line establishes settings for Point of Sale lines for the entire District or an individual cafeteria. The appearance of student information, behaviors during sales, security requirements, alerts, charges, and devices are established through the settings. The ability to specify meal-specific serving line parameter overrides both at the serving line config and the individual serving line has been added.
| Serving Lines (Local Level) |
| Serving Line Configurations (District Level) |
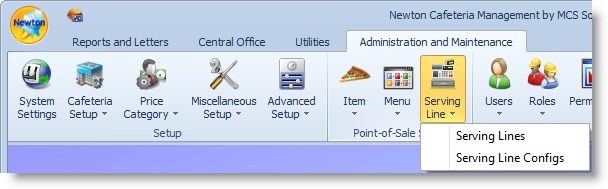
Locate and click on the Admin & Maintenance tab. Next, click on the Serving Line.
Serving Lines (Local Level)
Serving Lines allow a cafeteria to establish multiple serving lines and alter Point of Sale settings established at the District level. (e.g. The District utilizes fingerprint scanners at all locations except high schools. The input device setting can be modified for palm scanners.)
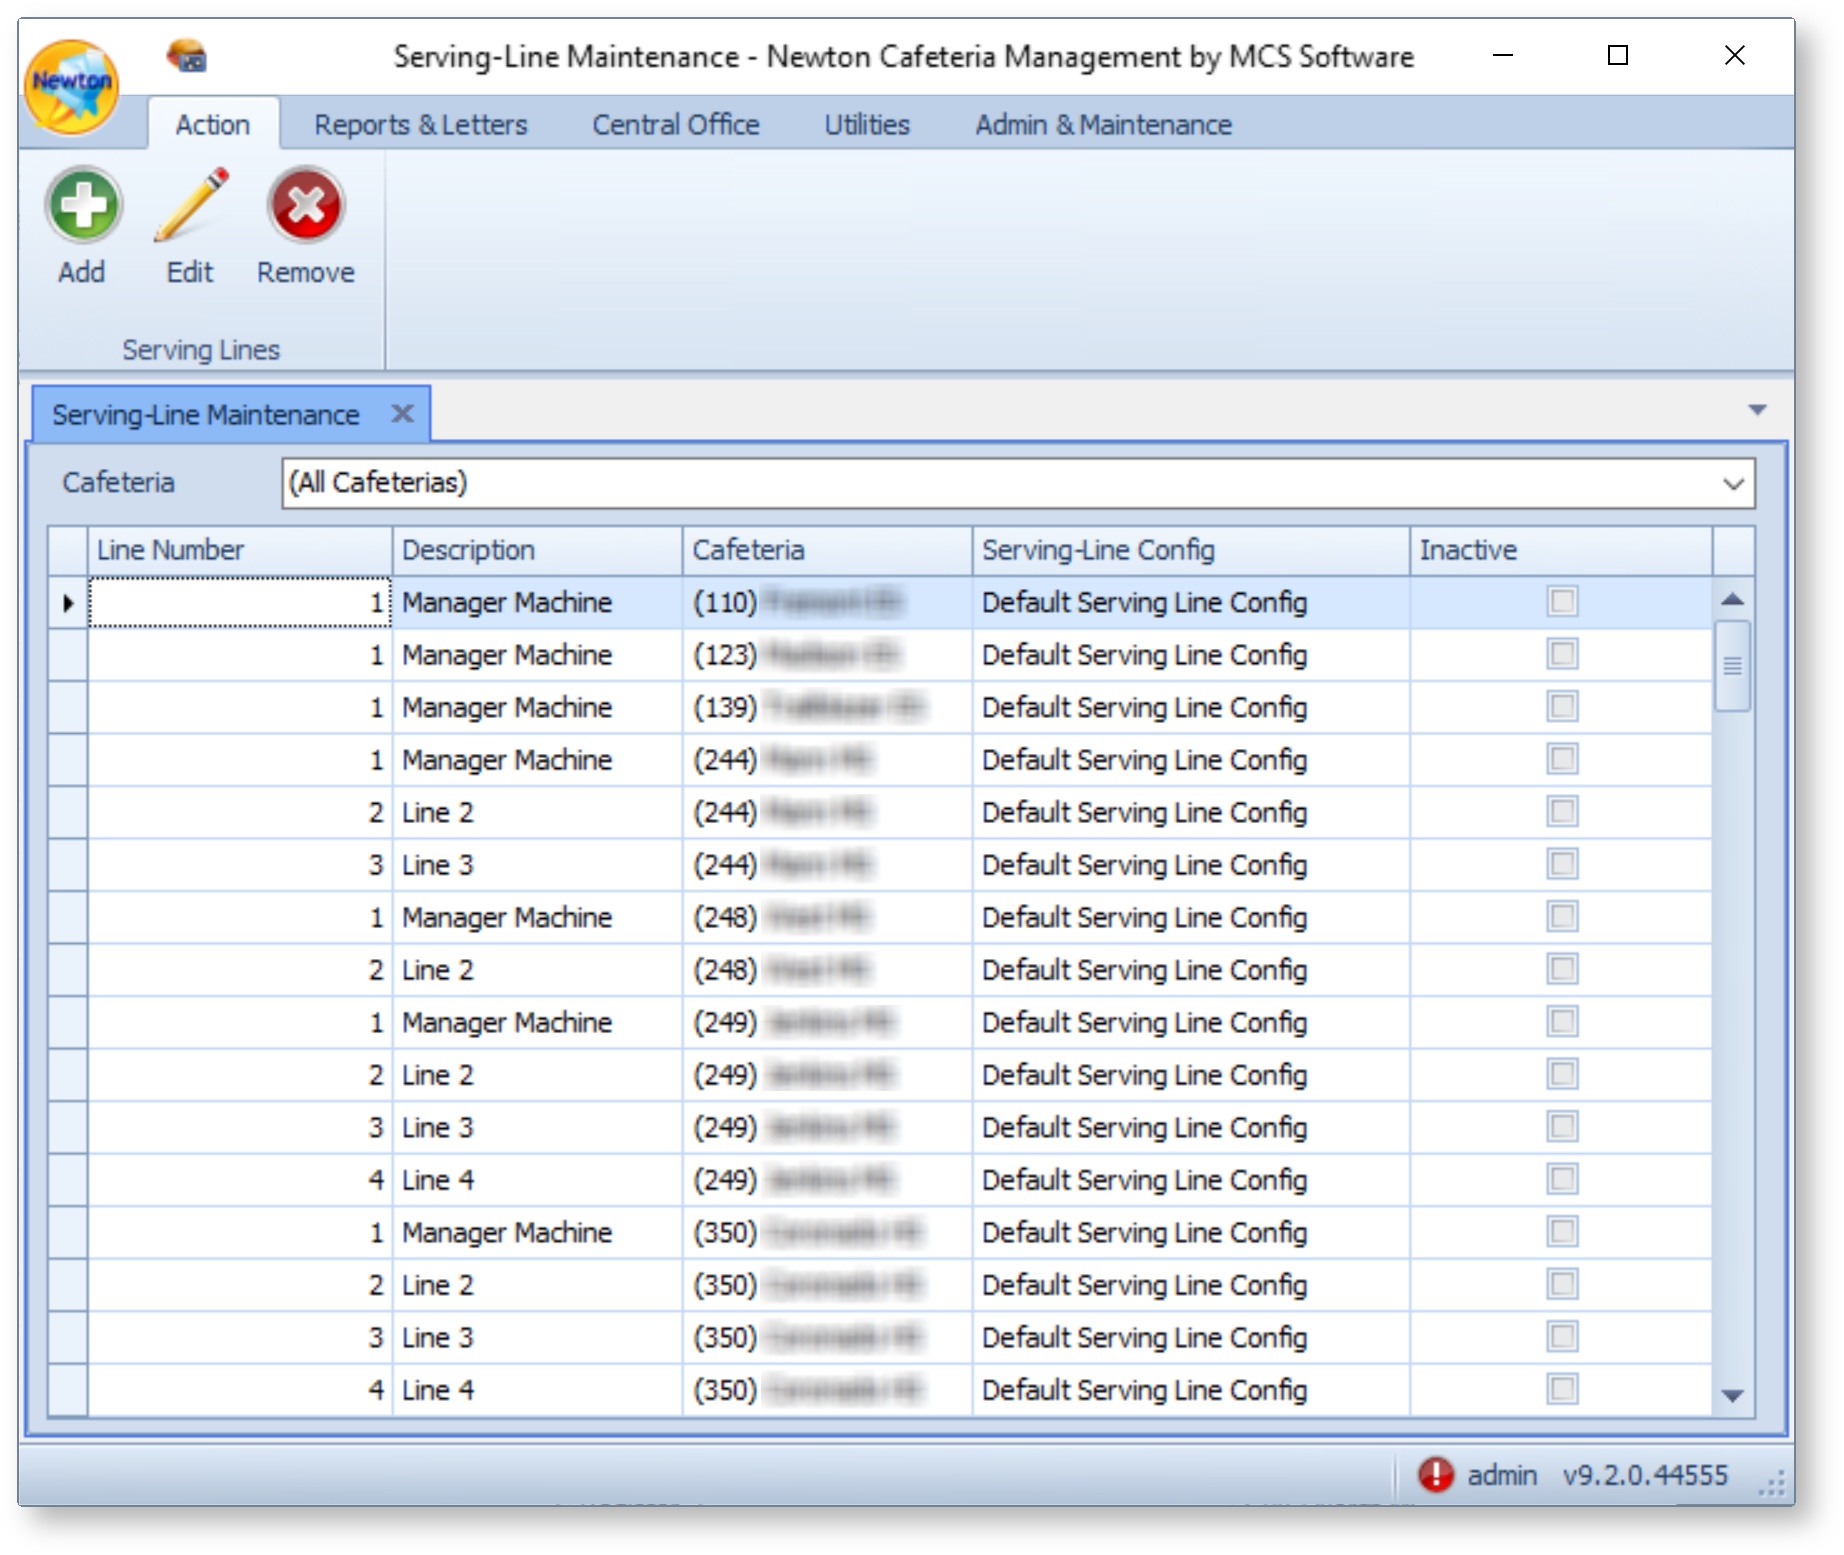
- From the Admin & Maintenance tab, select Item. Then, choose Serving Lines.
Click the Add button to create a new Serving Line. You can also select an existing Serving Line and choose Edit to make changes.
Multiple serving lines must be established at this level prior to launching Newton POS. Establishing serving lines first ensures the ability to select the appropriate serving line when setting up Newton POS.
- Establish settings for each serving line. Click Apply in each tab after establishing settings. After you have completed setup in all necessary tabs, click Ok.
- General
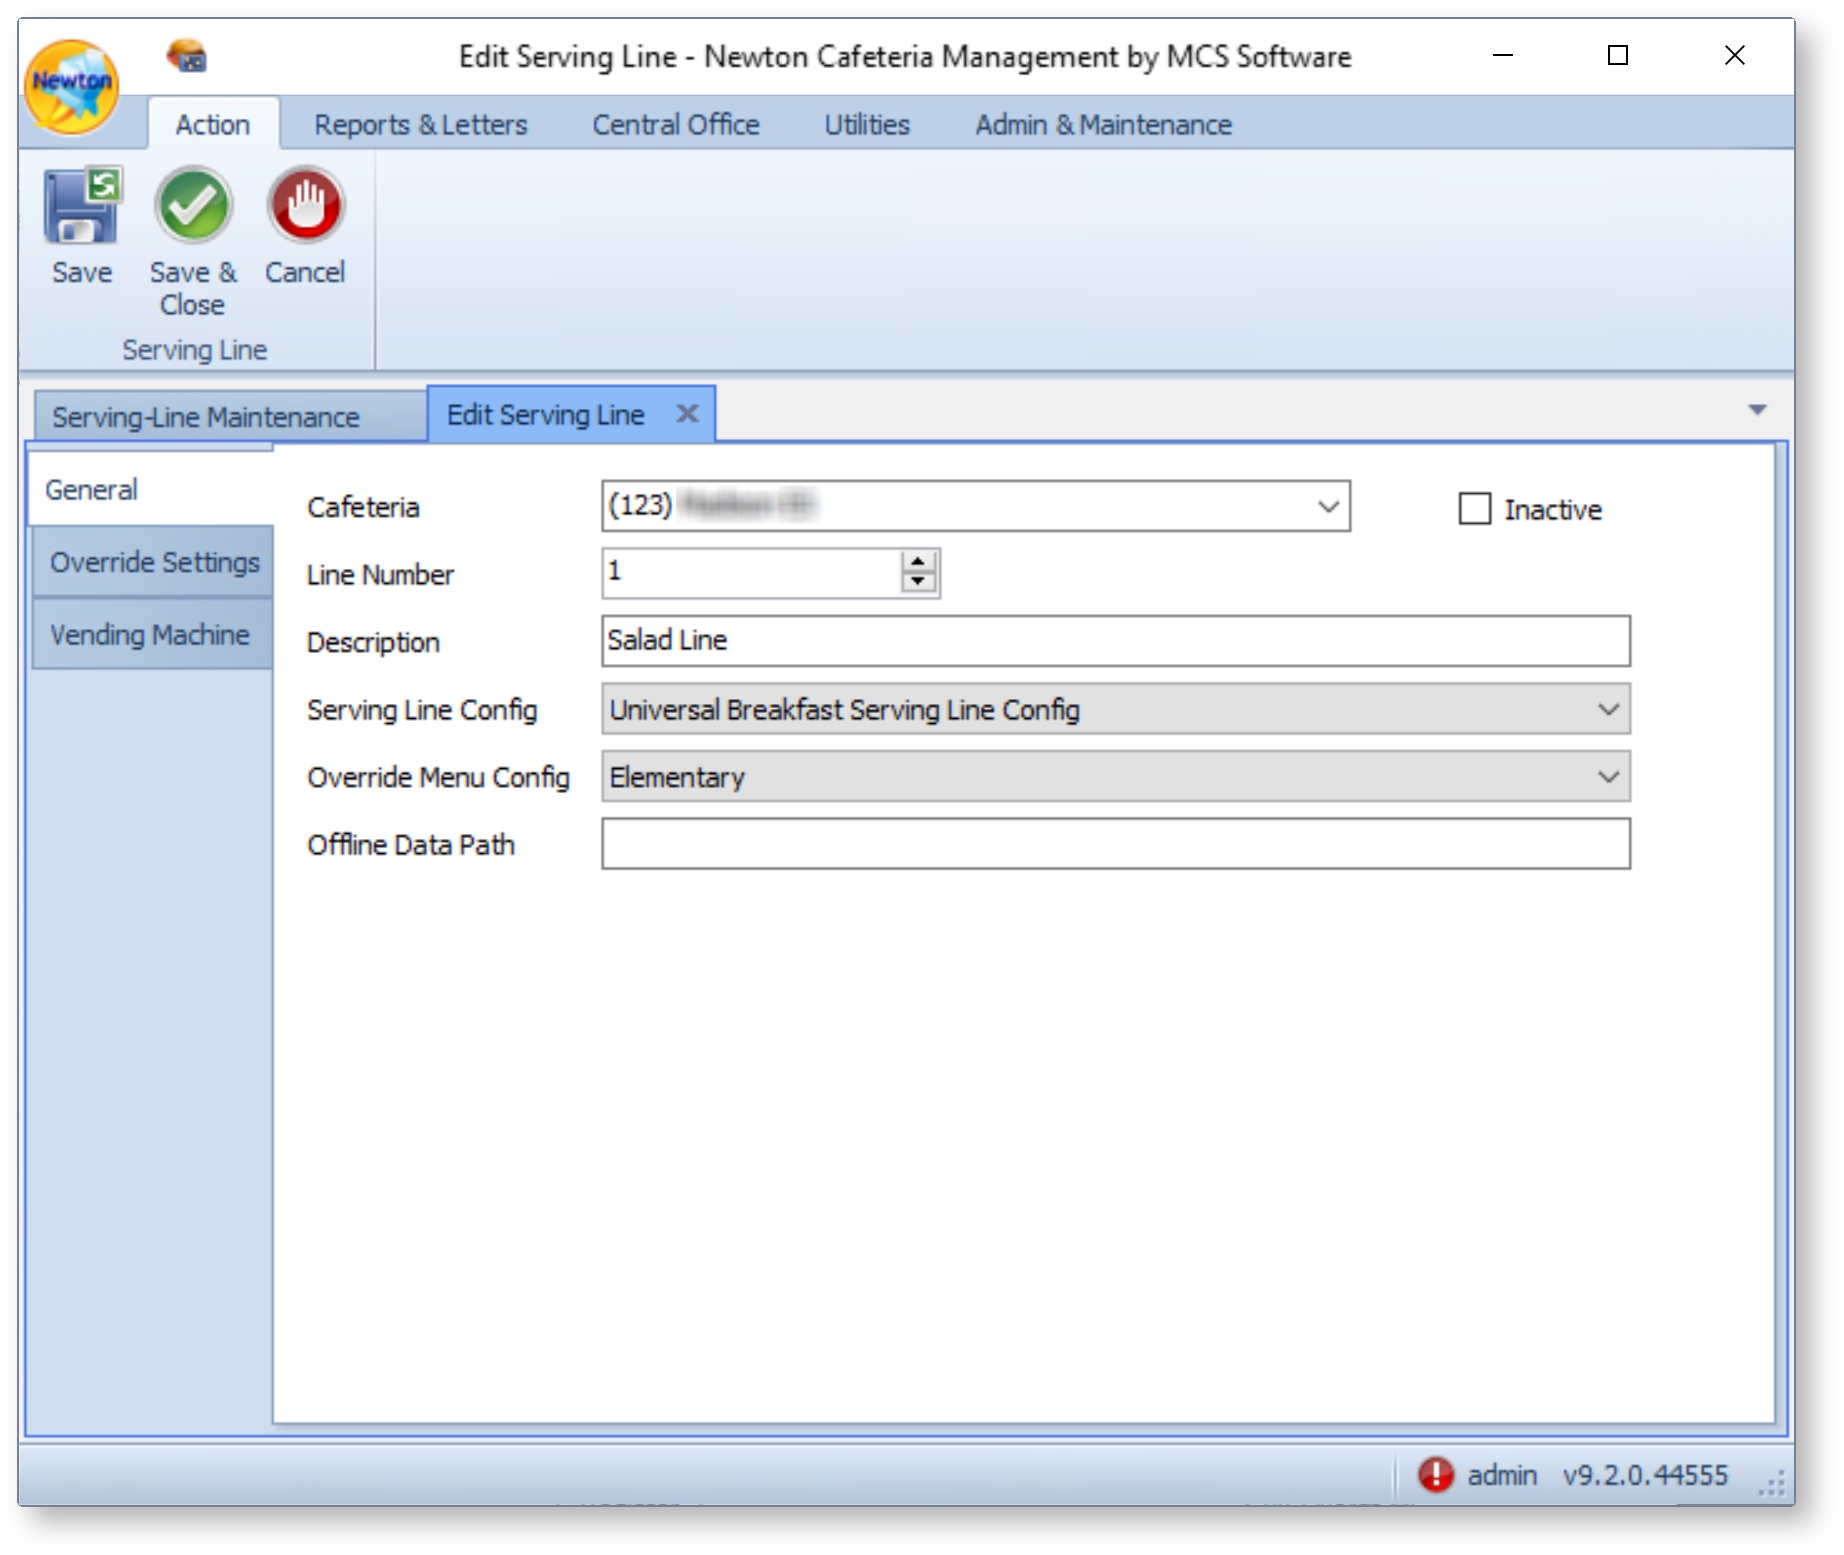
Cafeteria - Use the drop-down menu to select the cafeteria. By default, the cafeteria is selected on the Manager's machine.
Inactive - Select if a service line is inactive.
Line Number - Enter a number associated with the serving line.
Description - Enter a description of the serving line (POS Line 3, Snack, Express, Vending1).
Serving Line Config - Use the drop-down menu to select a Serving Line Configuration.
Override Menu Config - Use the drop-down menu to select an Override Menu Configuration.
Offline Data Path - Enter the path to be used when the network is offline.
Override Settings - Override Settings can be established independently for each meal type or as a Normal/Primary Value for all meal types.
Default Settings
Default settings are denoted by an asterisk (*).
Small List Font - Sets the list font to small.
Show Photos on Pick Screen - Displays customer photos on the Pick Customer screen.
Show Photos on Item Screen - Displays customer photos on the Item/Payment screen
Show Names 'Last, First' - Displays customer names in Last Name, First Name format.
Default to sorting by name instead of POSID - Sorts customer list by name instead of POSID.
Pad POSID Length - Sets the minimum number of digits to pad customers POSIDs (e.g. Pad length = 4. little Johnny's POSID is 19; he enters 0019; little Suzie's POSID is 124, she enters 0124).
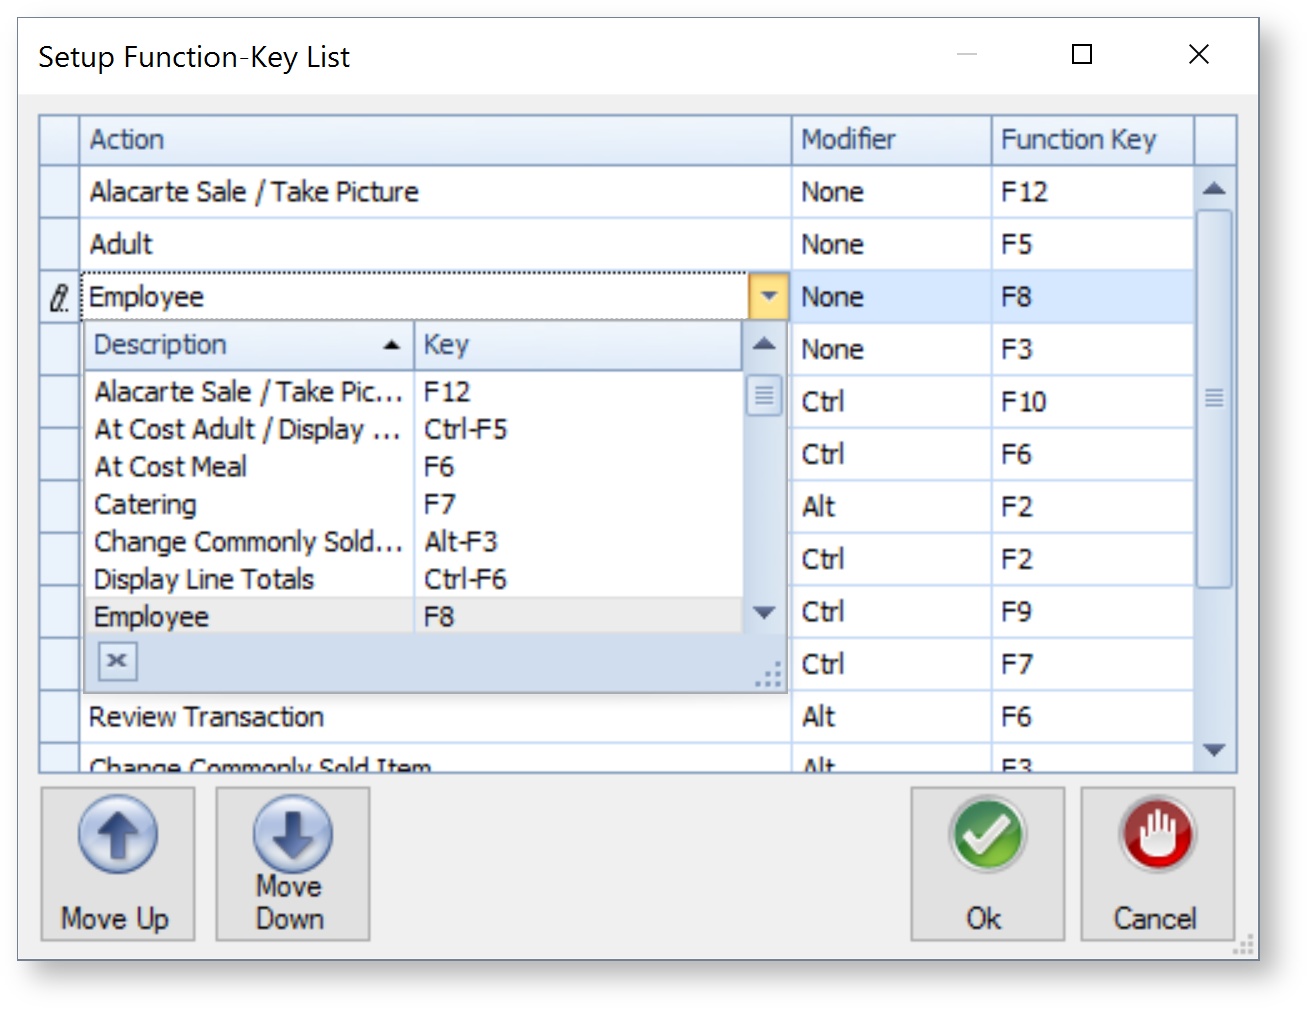
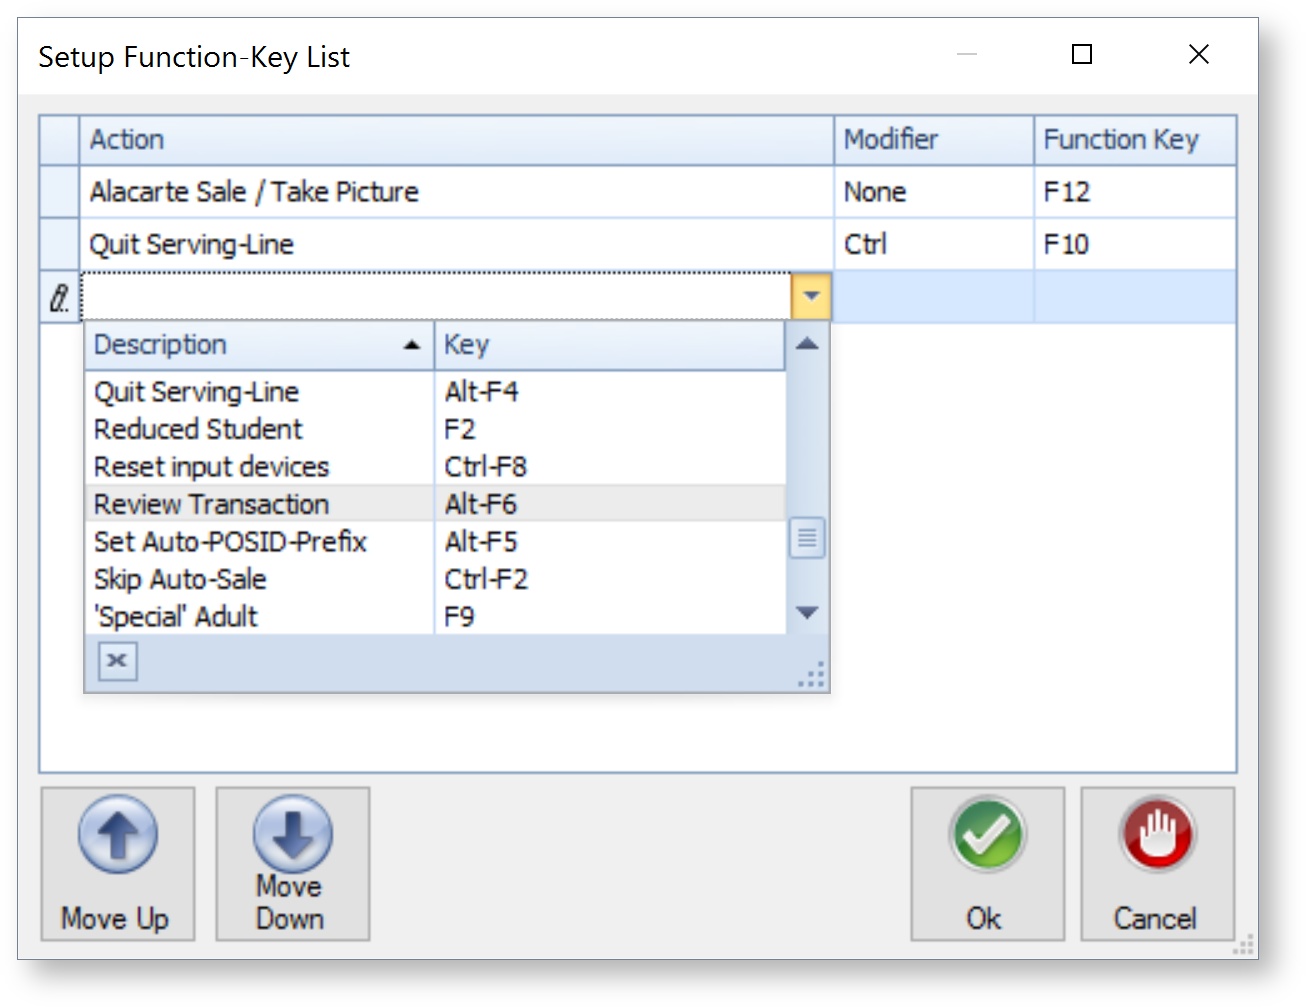
Student Search Screen Function Key Commands - Connects function keys to specific commands on the Customer Pick Screen. Click the ellipsis icon to set up the function-key list.
Customer Input Device Function Key Commands - Connects function keys to specific commands on the Customer Input Device Screen. Click the ellipsis icon to set up the function-key list.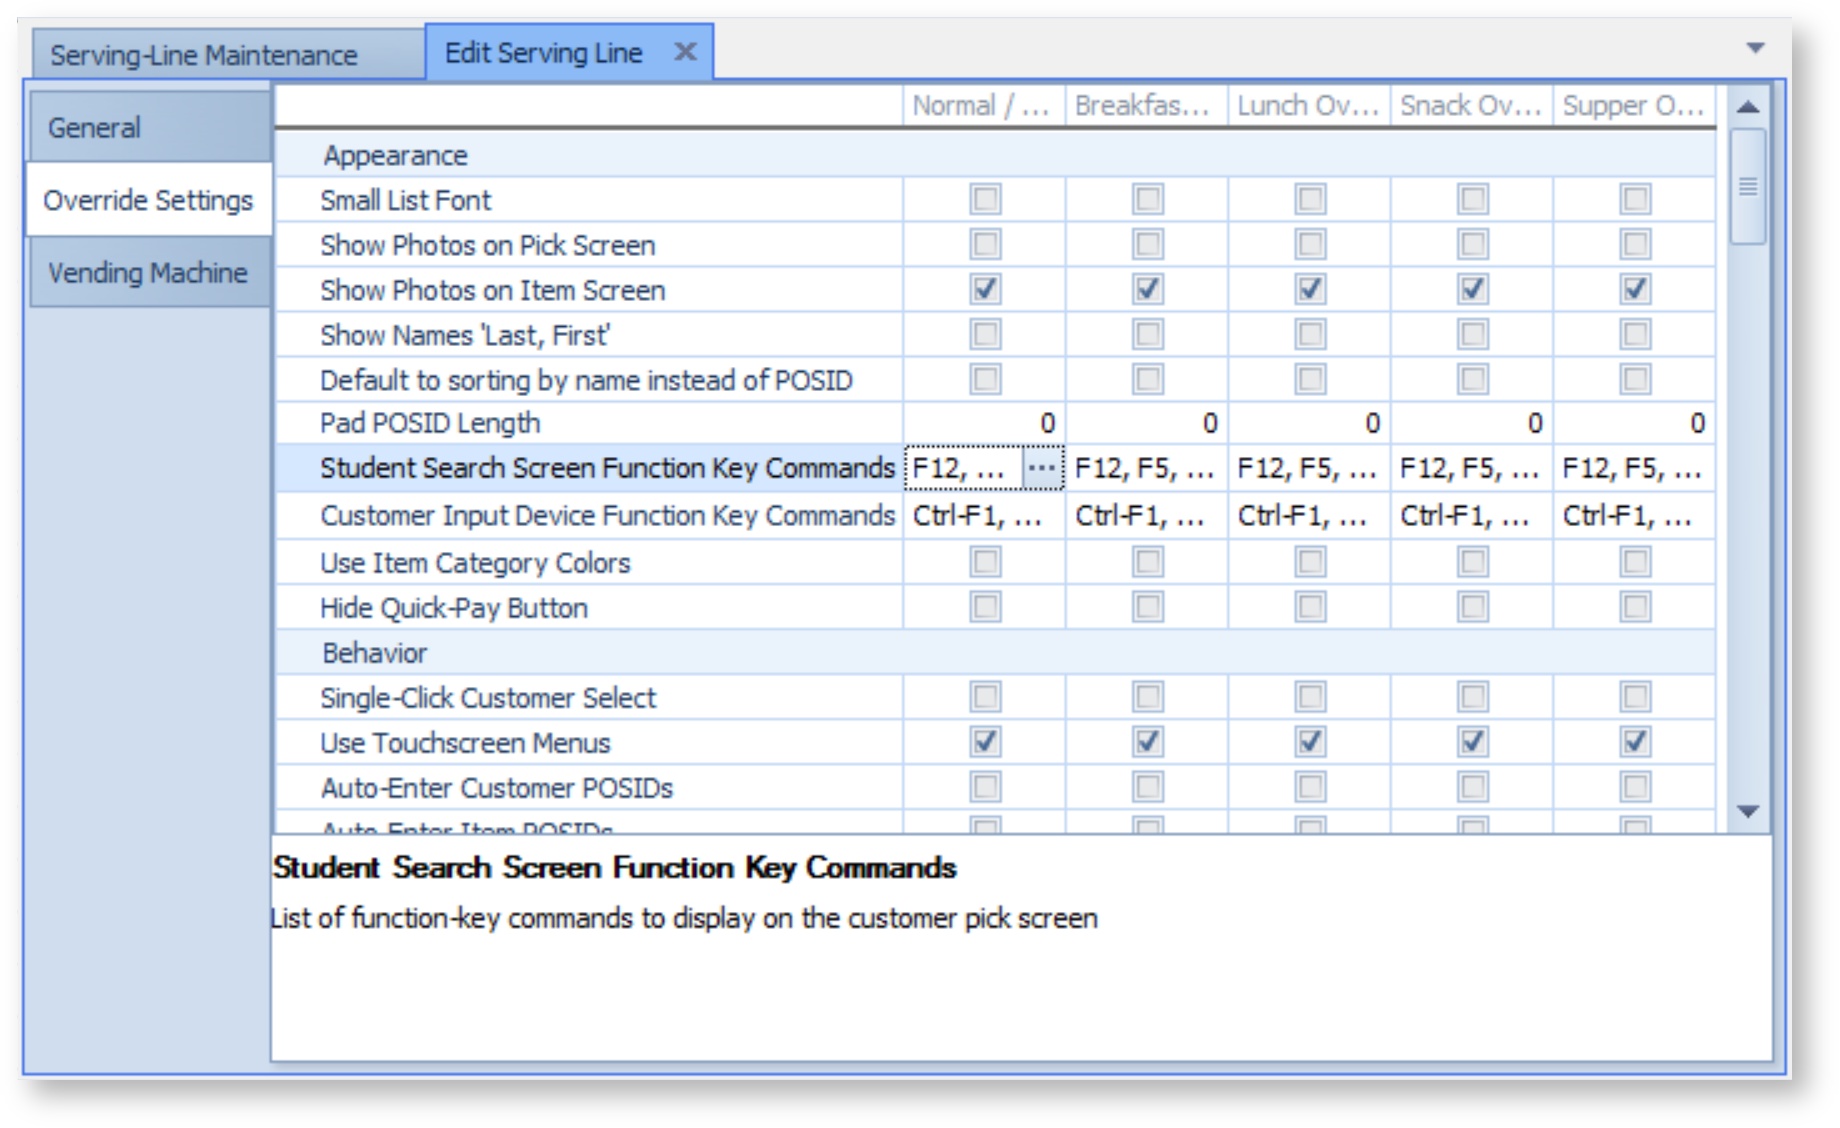
Actions - Use the drop-down arrow to select an action for Student Search Screen Function Key Commands and Customer Input Device Function Key Demands. - Add Customer from Other School
- Adult
- Alacarte Sale/Take Picture
- At Cost Adult/Display Student Info
- At Cost Meal
- Catering
- Change Commonly Sold Item
- Display Line Totals
- Display Student Info
- Employee
- Free Student
- Function Key Help
- Group Search
- Helper Student Sale
- Open Cash Drawer
- Pause serving line
- Paying Student
- Print Receipt
- Quick Sale #1
- Quick Sale #10
- Quick Sale #11
- Quick Sale #12
- Quick Sale #2
- Quick Sale #3
- Quick Sale #4
- Quick Sale #5
- Quick Sale #6
- Quick Sale #7
- Quick Sale #8
- Quick Sale #9
- Quit Serving-Line
- Reduced Student
- Reset input devices
- Review Transaction
- Set Auto-POSID-Prefix
- Skip Auto-Sale
- 'Special' Audit
- Toggle Customer Input
- Toggle Fast-Sale
- Toggle Images
- Toggle Quantity Sale
- Toggle Single-Click Select
- Transfer Money
Modifier - Use the drop-down arrow to select the modifier (None, Ctrl, Alt, Shift)
Function Key - Use the drop-down arrow to select a function key.Click Ok in the Setup Function-Key List window to save changes.
Use Item Category Colors - Displays the item picklist using item category colors (non-touchscreen mode).
Hide Quick-Pay Button - Removes the quick-pay button from the payment screen so the amount paid in a transaction must be entered manually.Vending Machine
Vending Machine Model
The vending machine model must first be established in Advanced Setup.
Locate All Button
Allows you to search your network for online vending devices.
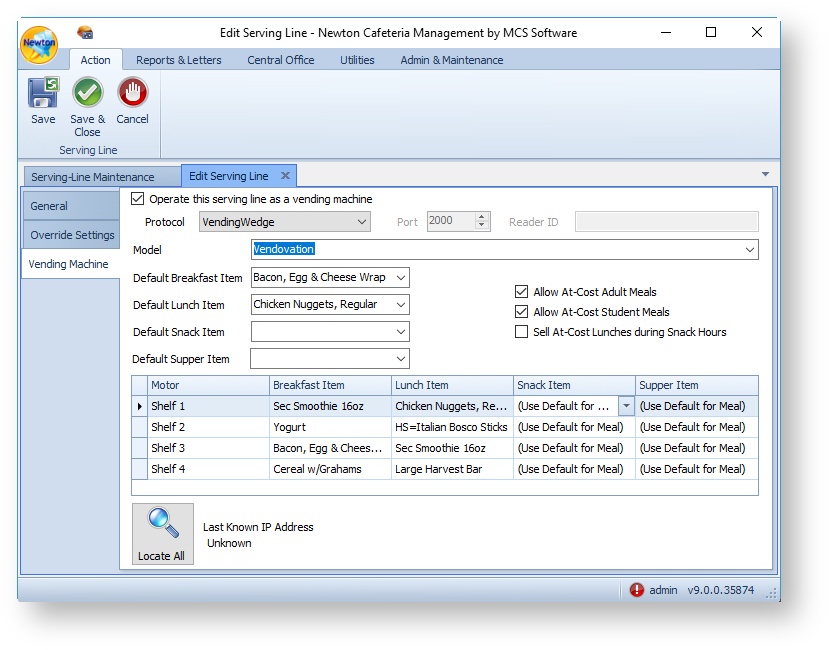
Operate this serving line as a vending machine - Place a checkmark in the box to designate this serving line as a vending machine.
Protocol - Use the drop-down menu to select which vending protocol to use. Options are Vending Wedge or VendConnect.
Port - Enter the VendConnect port number.
Reader ID - Enter the VendConnect reader ID.
Model - Use the drop-down menu to select the vending machine model.
Default Breakfast/Lunch/Snack/Supper Item - Use the drop-down menu to select a default item.
Allow At-Cost Adult Meals - Allows at-cost adult meals to be sold from the machine.
Allow At-Cost Student Meals - Allows at-cost student meals to be sold from the machine.
Sell At-Cost Lunches during Snack Hours - Allows at-cost lunches to be sold during snack hours.
Motor - The Shelf Name (defined in Advanced Setup) is displayed (not editable). Use the drop-down menu to choose an item for the motor and slot.
- General
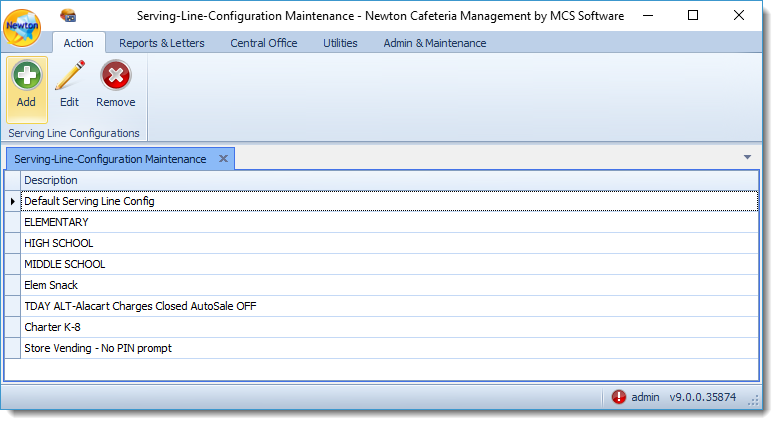
Serving Line Configurations (District Level)
Serving Line Configurations establish Point of Sale settings at the District level. You may create configurations in order to apply to multiple schools or vending stores.
- From the Admin & Maintenance tab, select Item. Then, choose Serving Line Configs.
Click the Add button to create a new Serving Line Configuration. You can also select an existing Serving Line Configuration and choose Edit to make changes.
Establish Serving Lines prior to establishing Serving Line Configurations
Multiple serving lines must be established at this level prior to launching Newton POS. Establishing serving lines first ensures the ability to select the appropriate serving line when setting up Newton POS.
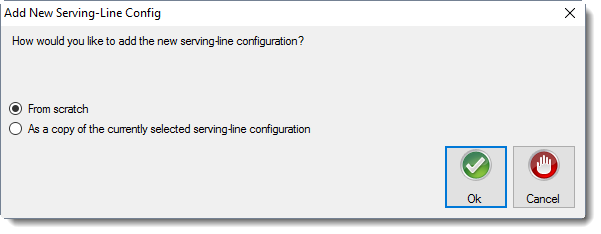
- Select how to add a new serving line configuration. Then, click Ok.
- Establish settings independently for each meal type or as a Normal/Primary Value for all meal types. Then, click Ok.
- Description - Enter a description of the serving line configuration (District K-5 Line Configs, District High School Line Configs).
- Menu Config - Use the drop-down arrow to select a Menu Configuration.
Parameters - Establish serving line configuration parameters.
Small List Font - Sets the list font to small.
Show Photos on Pick Screen - Displays customer photos on the Pick Customer screen.
Show Photos on Item Screen - Displays customer photos on the Item/Payment screen
Show Names 'Last, First' - Displays customer names in Last Name, First Name format.
Default to sorting by name instead of POSID - Sorts customer list by name instead of POSID.
Pad POSID Length - Sets the minimum number of digits to pad customers POSIDs (e.g. Pad length = 4. little Johnny's POSID is 19; he enters 0019; little Suzie's POSID is 124, she enters 0124).
Student Search Screen Function Key Commands - Connects function keys to specific commands on the Customer Pick Screen. Click the ellipsis icon to set up the function-key list.
Customer Input Device Function Key Commands - Connects function keys to specific commands on the Customer Input Device Screen. Click the ellipsis icon to set up the function-key list.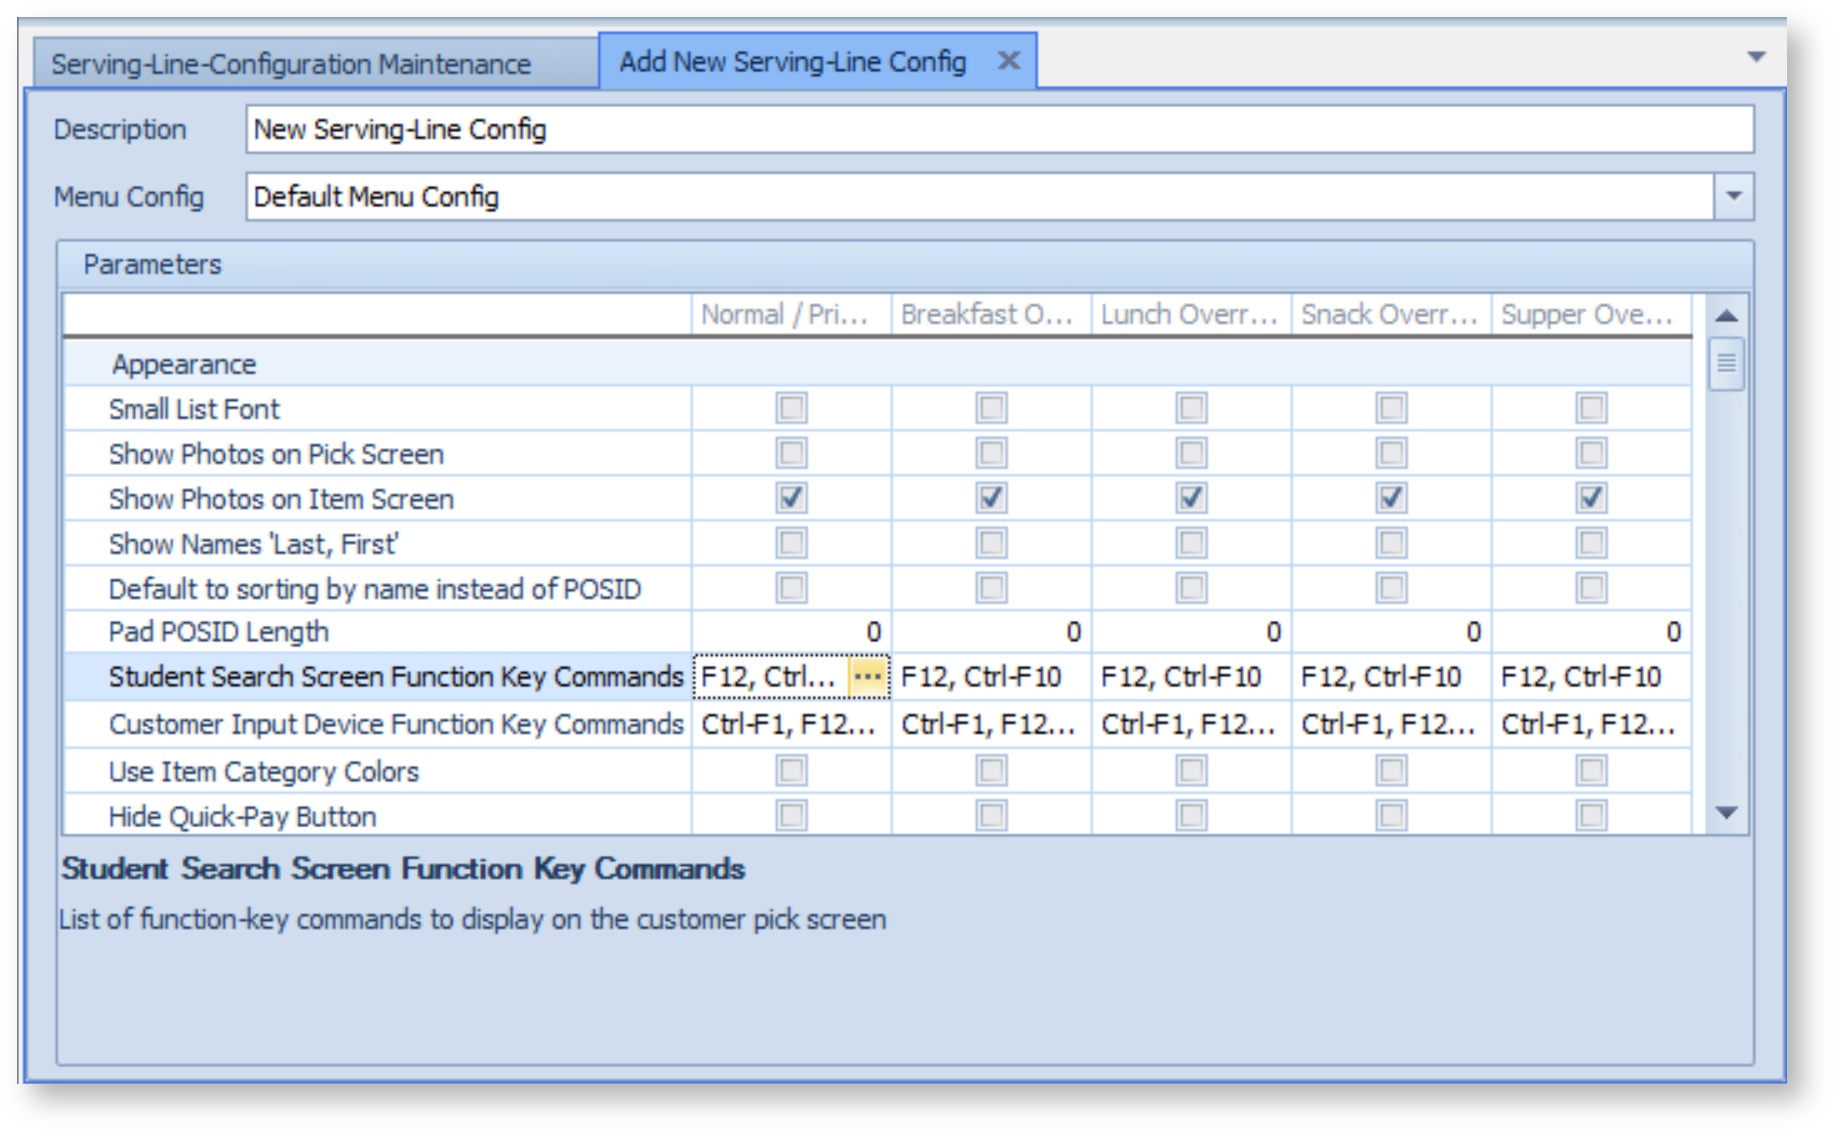
Actions - Use the drop-down arrow to select an action for Student Search Screen Function Key Commands and Customer Input Device Function Key Demands. - Add Customer from Other School
- Adult
- Alacarte Sale/Take Picture
- At Cost Adult/Display Student Info
- At Cost Meal
- Catering
- Change Commonly Sold Item
- Display Line Totals
- Display Student Info
- Employee
- Free Student
- Function Key Help
- Group Search
- Helper Student Sale
- Open Cash Drawer
- Pause serving line
- Paying Student
- Print Receipt
- Quick Sale #1
- Quick Sale #10
- Quick Sale #11
- Quick Sale #12
- Quick Sale #2
- Quick Sale #3
- Quick Sale #4
- Quick Sale #5
- Quick Sale #6
- Quick Sale #7
- Quick Sale #8
- Quick Sale #9
- Quit Serving-Line
- Reduced Student
- Reset input devices
- Review Transaction
- Set Auto-POSID-Prefix
- Skip Auto-Sale
- 'Special' Audit
- Toggle Customer Input
- Toggle Fast-Sale
- Toggle Images
- Toggle Quantity Sale
- Toggle Single-Click Select
- Transfer Money
Modifier - Use the drop-down arrow to select the modifier (None, Ctrl, Alt, Shift)
Function Key - Use the drop-down arrow to select a function key.Click Ok in the Setup Function-Key List window to save changes.
Use Item Category Colors - Displays the item picklist using item category colors (non-touchscreen mode).
Hide Quick-Pay Button - Removes the quick-pay button from the payment screen so the amount paid in a transaction must be entered manually.