Working Offline
- Robin Rodrigue
- Nora Kinal
When a network is not available, it is sometimes necessary to work offline. An exciting feature of Newton is the ability to store data on local POS lines, local manager machines, as well as the server. As long as the cafeteria has power, transactions should never have to be handwritten. Prior to working offline, an offline data path should be established.
There are a couple of differences to be aware of depending on how a cafeteria is set up.
- Working offline from the Manager's Machine - Please refer to the Manager's Machine instructions.
- Working offline for Multiple Days.
- Working offline from a POS Machine - Cafeterias that have 1 or more computers/line stations in addition to the Manager's machine, please refer to the POS instructions.
Manager's Machine
From the manager's machine follow the steps below to work offline when there is no network available.
Step 1: Login to Newton

Step 2: When there is not a network available, the MCS Launcher-Retry Connection window will display.
- Select Cancel Upgrade twice and then the Login window will open as usual.

Step 3: Login with your username and password. Then, select Work Offline.
The workstation must be a computer that is permanently attached to a cafeteria to work offline.

Step 4: Under the Point-of-Sale ribbon click Start New Day or click Start Operating Day under the Checklist.
- Select an operating day from the calendar and click Ok.

- Click Start Meal (Breakfast or Lunch) in the Checklist and select an operating day from the calendar and click Ok.

Complete Step 5 if you are using an external drive on a Newton POS machine that does not have an intranet connection (your computers are unable to connect/talk to each other).
Step 5: Select the Line Disks button.

- By default, only serving lines where an offline data path has been established will automatically be selected for creation. To create a line disk for one line, make sure to uncheck all other lines. Then, click Ok.

- Insert the external drive and click Ok.

- Once the Line Disk has been successfully created, click Ok.

Step 6: Remove the external drive by following the steps below.
Follow these instructions for properly removing the external drive. Failure to remove an external drive properly can result in data corruption and loss. It is recommended you always follow these procedures when removing an external drive from any computer.
- Close any open folders or files on the external drive. If any folders or files are open, the drive will not allow you to complete the ejection process.
Option 1
- To remove the external drive, locate the USB icon in the bottom right-hand corner of your computer screen. Placing the mouse over the icon should display the following message: Safely Remove Hardware and Eject Media. Click on the icon.


- Select the correct external drive.

- You should receive a message in the bottom right-hand corner of the computer informing you it is now safe to remove the hardware. Remove the hardware from the computer.

Option 2
- From the Start Menu, locate and click on Computer.

- Locate and right-mouse click on the drive to remove. Then, select Eject.

- You should receive a message in the bottom right-hand corner of the computer informing you it is now safe to remove the hardware. Remove the hardware from the computer.
If you need to create additional Line Disks for other serving lines, repeat instructions Steps 5 and 6.
Step 7: Select the Main Machine button.

- Select a serving line and click Ok.

Step 8: Login and serve the meal.
- Toggle F1 to change Meal type
- Toggle F2 to change Menu
- When working offline, the meal and menu will have to be manually selected.
- Login to Newton with your Username and Password. Then, click Ok.

Step 9: Complete the meal transactions. When you are done, click Quit Serving-Line.

- The Quit NewtonPOS window, click yes.

Step 10: In the End Batch window, enter cash and check amounts. When you are done, click Ok.

- If you are finished entering amounts, click Yes.

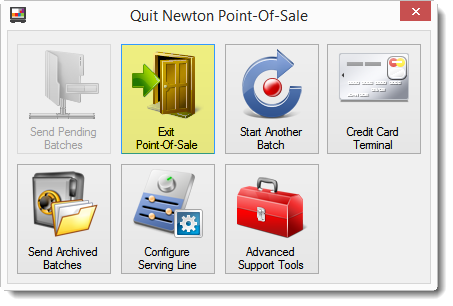
Step 11: If the network issues are not resolved, you may select Exit Point-Of Sale.
Step 12: In the Meal Control Panel, click Stop Meal.

- In the End Lunch window, if you are done serving the meal and wish to stop, click Yes.

- Click Close to exit the Meal Control Panel.

Step 13: Finish the Day
Click Post Operating Day in the Checklist.
When the network has been restored, Newton will need to be restarted and you can post as usual.
On occasion, when network issues cannot be resolved the first day, you will need to work offline for multiple days. Refer to instructions on Posting Previous Counts - One Day or Posting Previous Counts - Multiple Days.

- In the Bank Deposit tab, enter cash amounts. If no cash was received, click No cash was allocated today.

- In the Daily Figures tab, enter attendance counts, review the transactions, and make necessary changes. Once you have reviewed the daily figures, click Reviewed in the top right-hand corner.

- Complete other tabs (Expenses & Revenue, Labor Hours, Misc Counts, POS Batches) as necessary. When you are done, click Save without Posting in the bottom left-hand corner.

Working Offline for Multiple Days
On occasion, when network issues cannot be resolved the first day, you will need to work offline for multiple days.
It is recommended that you follow these steps at the end of the operating day if you know you will be working offline for a number of days. This will save time during preparation the next day and ensure the operating day is not combined with the current operating day.
Step 1: Under the Point-of-Sale tab, locate and click on Review Transactions.

Step 2: In the Edit/Review POS Batches window, highlight a batch from a previous day and click Toggle/Skip.
You must repeat this process for all previous day batches.
- After you have skipped all previous day transactions, click Close.

Step 3: Locate and click on Cancel/Abandon Day.

Step 4: The Cancel Operating Day window will appear asking if you are sure you want to cancel the operating day. Selecting Yes allows you to continue serving meals.

Confirm there is no operating day running in the bottom left of the screen. Once you have confirmed there is no operating day running, start a new operating day by following the steps above.


Working Offline from POS
From the POS or cash lines, follow the steps below to work offline when there is no network available.
In order to begin working offline in Newton POS, the meal must first be started on the Manager's Machine.
Step 1: Login to Newton POS.

Step 2: Close the Socket Exception Error.

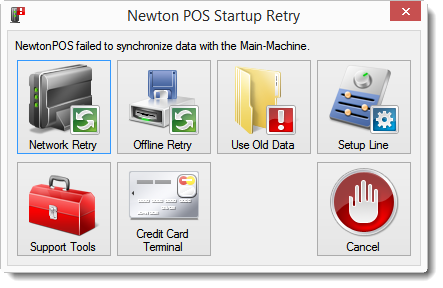
Step 3: There are two ways to work offline in Newton POS. Choose the best procedures in this step to work offline.
- Use Old Data
If you do not have an internet connection (your computer is unable to connect to an outside source/talk to the server), select Use Old Data. The POS will run off the last set of synced data.

- Offline Retry
In order for Offline Retry to work, you must first have established Offline Serving Lines. For instruction on how to do so, refer to Setting the Offline Data Path.
If you do not have an intranet connection (your computers are unable to connect/talk to each other), select Offline Retry.
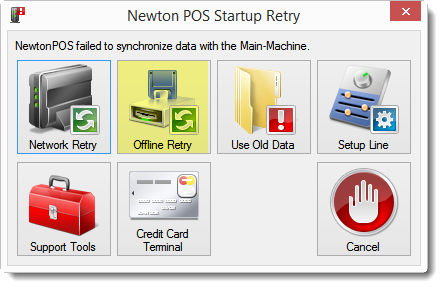
Insert the external drive with the Line Disk into the computer and click Ok.

Step 4: Login and serve the meal.
- Toggle F1 to change Meal type
- Toggle F2 to change Menu
- When working offline, the meal and menu will have to be manually selected.
- Login to Newton with your Username and Password. Then, click Ok.
Step 5: Complete the meal transactions. When you are done, click Quit Serving-Line.
- The Quit NewtonPOS window, click yes.
Step 6: In the End Batch window, enter cash and check amounts. When you are done, click Ok.
- If you are finished entering amounts, click Yes.
- If the network is still not available, a Connection Failed status message will display. Select Cancel to close the screen.

Step 7: If you are using an external drive, click Send Pending Batches. This will create a batch file and place it on the external drive in order for data to be uploaded on the Manager's Machine.
If the network issues are not resolved, you may select Exit Point-Of Sale.
- You will receive a warning that not all batches have been sent to the main machine.
- Select Yes if network is functional, or No if it is not available.
If the network comes online and the batches are not being recognized when submitted, close out of Newton POS and reopen it.

Once the network has been restored, open Newton POS and it will prompt to send pending batches the next time you exit.