Back Office Operations
- Robin Rodrigue
- Nora Kinal
The Operations panel for Cafeteria Operators/Back Office allows you to add/edit/subscribe POS customers, edit POS menus. add/edit POS groups, create serving-line user accounts, start/stop meals, create line disks, enter payment, review transactions, view real-time server communication, enter miscellaneous income and expenses, and chat with line operators.
| Maintenance | Real-Time Server |
| Meal Control Panel | Misc Income/Expenses |
| Enter Payments | Serving-Line Chat |
| Review Transactions |
From the Point-of-Sale tab, locate Operations in the ribbon.

Maintenance
The Maintenance option allows you to add/edit/subscribe customers, edit menus, add/edit POS groups, and add/edit serving-line users.
From the Point-of-Sale menu, click on Maintenance.
Customers
Add, edit, or subscribe customers.
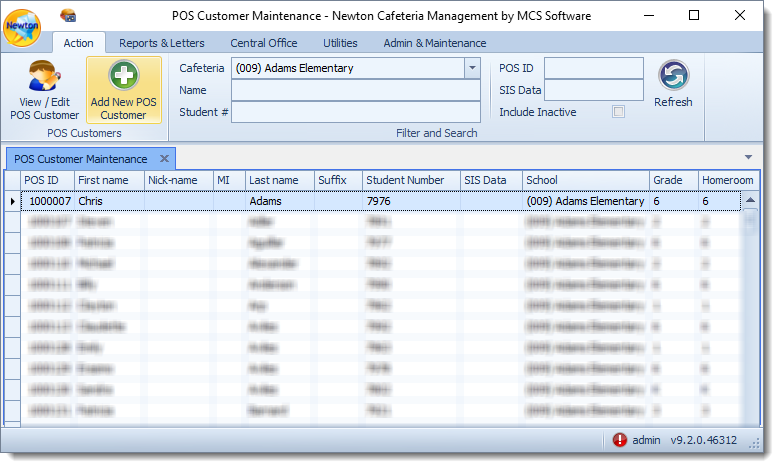
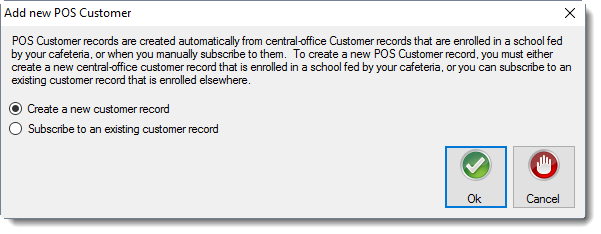
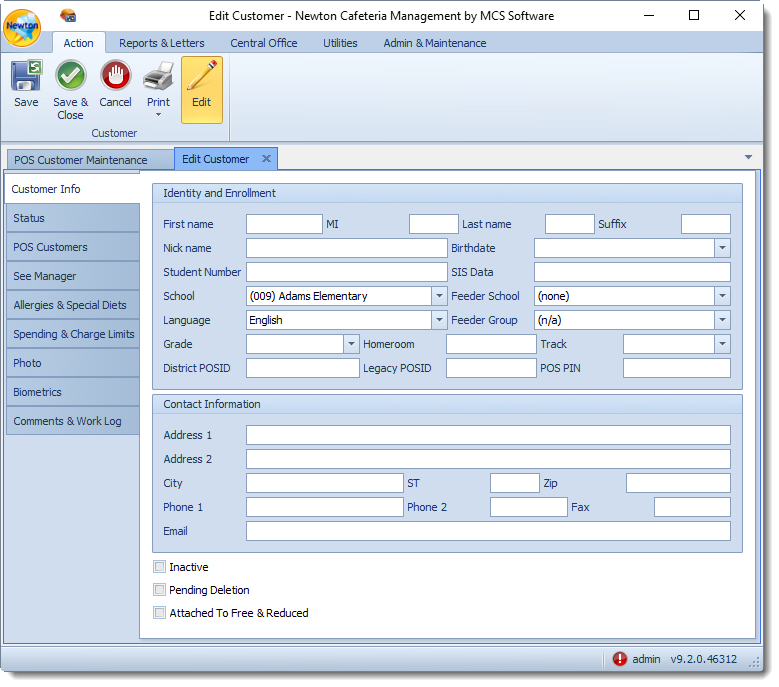
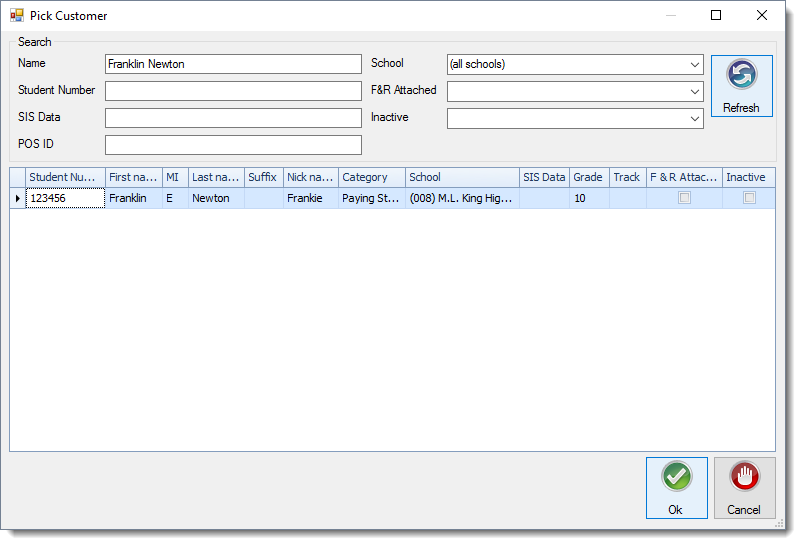
The Customer Maintenance option allows you to add new POS customers, edit existing customers and POS customers, review letter and record history, apply payments, transfer money, give refunds, make corrections, edit subscriptions to cafeterias, and print account statements. Locate and click on POS Customer Maintenance. Allows you to add an existing customer as a POS customer. After you have completed Steps 1 and 2, continue with Step 2 under Central Office Operations#View. Select how to create the new POS Customer. Then click Ok. POS Customer records are created automatically from central-office Customer records that are enrolled in a school fed by your cafeteria, or when you manually subscribe them. Create a new customer record - Creating a new customer record will bring up the Edit Customer window. Complete the information as you would when completing Customer Maintenance. Subscribe to an existing customer record - Subscribing to an existing customer record will bring up the Pick Customer window. Enter Pick Customer information. Then, click Refresh. Select the customer. Then, click Ok.Add
Once you have established all the necessary information for the customer, click Ok.
Menus
Edit menu items offered on the POS serving line.
Menus are established at the Central Office level. Editing menus in this section will allow you to override those settings.
- Locate and click on Maintenance from the ribbon. Then, select Menus.
- In the Edit Menus (Local Override) window, select the menu you wish to edit. Then, click Edit Menu.

- Select a menu item from the list on the left. Left-mouse click and hold down the button to drag and drop the menu item to a button on the right-hand side of the screen.

- Click on a button to edit button options.

- Establish touchscreen button appearance options. Then, click Ok.
- Caption - Enter a caption for the item. It will appear in the Preview screen.
- Image - If you are using an image for an item, click the ellipsis. Then, select images uploaded in Touchscreen Images or click Add Image to select one from your local or network drive.


- Shortcut to Page - Creates a shortcut/link to another page of items. e.g Caption = Veggies; Shortcut to Page 2; Menu Items = Carrots, Corn, Green Beans, Mixed Veggies, Peas
- Sell Menu Item(s) - Item(s) is applied to customers sale by clicking on the button.
Menu Items - Click the plus + icon to select an item from the menu list established above. Then, click Ok.
Search Warning
If you have inadvertently opened the Add Menu Item search screen, click Cancel and do not click Ok. Clicking Ok will add the top most item in the search screen to the menu button.
Font Style - You may choose to establish a different font size and font style (Bold, Italics, Underline) for the item.
Foreground Color - Use the drop-down arrow to choose a foreground color (font color).
- Background Color - Use the drop-down arrow to choose a background color (color behind the text and/or image).
- Once you are finished making any necessary edits, click Save & Close.

Make any other necessary edits to additional menus. When you are done, click the X next to the Edit Menus tab.
To rest menus to default central office settings, click Reset Menu. Then, click Yes.

POS Groups
Establish customized POS groups.
Once a customized POS Group has been established, each student record must have the POS Customer Type modified to reflect the correct POS Group.
- Locate and click on Maintenance from the ribbon. Then, select POS Groups.
- Enter a new POS group. Then, click Ok.

- Locate each student's record that will be part of the POS group and click Edit POS Customer.

- In the POS Customer Data window, Use the drop-down menu to select the correct POS Group. Then, click Ok.

Serving-Line Users
Add new users, change user passwords, and inactivate users whose role is strictly serving line.
- Locate and click on Maintenance from the ribbon. Then, select Serving-Line Users.
- Complete POS-Only User information. Then, click Change Password.
- User name - Enter a username.
- Full Name - Enter the user's full name.
- Role - Use the drop-down menu to select Line Operator if the role is different.

- Establish a password. Then, click Ok.
- Enter the user's password or have the user enter a password.
- Confirm the password by entering it a second time.

- After you have entered all new POS Line Operator's, click Save & Close.
Mass Update POS Groups/Homerooms
The Mass Update POS Groups/Homerooms tool allows you to quickly perform mass updates to POS Groups and Homerooms to a selected school.
- Locate and click on Maintenance from the ribbon. Then, select Mass Update POS Groups/Homerooms.
- You have two options when utilizing the mass updater feature. You may edit information within the window or use the Mass Update wizard. When you are done, click Ok.
- Modify information within the Mass Updater POS Groups/Homeroom window.
- Modify information for each student.
- Homeroom Override - Correct the student's homeroom by entering text in the Homeroom Override column.
- POS Group - Use the drop-down menu in the POS Group column to select the correct POS Group for the student.

- Modify information for each student.
- Modify information with a wizard.
- Click Group Update at the bottom of the window.
- In the welcome window, click Next to begin the process.

- Select which mass update you wish to perform. Then, click Next.
- POS Groups - Use the drop-down menu to select a POS Group.

- Homerooms - Enter the new homeroom.

- POS Groups - Use the drop-down menu to select a POS Group.
- Click Add POS Customers to select customers for POS updates.

- Use the Search tool by entering information and clicking Refresh.
- Place a checkmark by each customer you wish to update by clicking in the box. Then, click Ok.

- Repeat Steps v-vi until you have selected all customers in which updates are needed.
Review the list of customers to ensure the correct ones are selected. Then, click Next.
The Current Homeroom and Current POS Group columns will appear blank or as (none) unless a previous override has been performed for a selected customer.

- Click Finish to complete the process.

- Modify information within the Mass Updater POS Groups/Homeroom window.
Meal Control Panel
The Meal Control Panel allows you to start and stop meals, run Newton POS from the main machine, and create line disks to serve meals while working offline.
Any items grayed out are not available due to a meal not currently running or a meal already in progress.
- Locate and click on Meal Control Panel.
- Select the appropriate action.


Start Meal
Starts a meal for the operating day.
- Locate and click on Start Meal from the control panel or Start Meal (Breakfast/Lunch) from the checklist.

Select a meal type and day. Then, click Ok. By default, the current date is selected.
If meals need to be entered for a different day, you may select a different day. However, note that transactions from the past day cannot be posted with the current operating day. For more information on posting previous operating days, refer to Tips & Troubleshooting.

You will see a series of processes running while information is gathered.
- In the Meal Control Panel, select the appropriate task.
- Locate and click on Start Meal from the control panel or Start Meal (Breakfast/Lunch) from the checklist.
Main Machine
Allows you to operate the current machine as the main serving line.
Newton now has the added ability to run the main serving line (Newton POS) separate from Newton. For more information on how to establish this setting, refer to details by clicking here.
- Click the Main Machine button.
- In the Attach Serving Line window, select the proper serving line. Then, click Ok.

Line Disks
Line disks can be created when there is no network connection or if one or more computers are not connected to a network. POS information is placed on a removable drive and accessed on the serving line. Once transactions have been completed and the serving line is closed, the current data can then be imported back into the main machine to complete daily operations.
- Click the Line Disks button.
Select the appropriate line in which you would like to create a line disk. You may choose to include photos and program updates by placing a checkmark in the Options box. Then, click Ok.
It is highly recommended that line data for each serving line is created separately on separate external storage devices (e.g. cd, flashdrive, external hard drive, etc.)

- Insert the removable drive in the location indicated. Then, click Ok.

You will see a series of processes running while the line disk is created.
Once the data has been successfully created, the following window will appear.
External Drive Removal
Follow the procedures on How to Properly Remove an External Drive to remove the storage device. These procedures should always be used when removing external devices for all computers. Failure to properly remove external devices can result in data corruption.

Stop Meal
You must stop the current meal once all sales have been completed for the specific meal. Failure to stop a meal results in double-usage sales and you will not be able to complete your operating day.
- Click the Stop Meal button.
- You will be prompted with a confirmation window asking your permission to stop serving the current meal. Click Yes to stop the meal.

Close
Allows you to close the Meal Control Panel in order to continue any necessary functions will meals are running.
Enter Payments
Allows you to enter payments received from customers.
- From the Point-of-Sale tab, select Enter Payments.
- Enter a POSID or name in the search box. Once you have located and selected the correct student, click Make Payment.

- Enter payment information. Then, click Ok.

Amount - Enter the amount of the payment. Then, select a payment type.
Cash
Credit - Enter the check number and the date the check was written.
Transaction Comments - Enter necessary comments in regards to the transaction.
Print Receipt - Allows a receipt to be printed after the payment transaction has been posted.
Review Transactions
Each time a serving line is closed, a new transaction batch is created for a meal and serving line. The ability to review, retrieve, skip, and remove these transactions can be accessed by selecting the appropriate buttons. You may also search for and correct double-card usages.
- Locate and click on Review Transactions.
In the Edit/Review POS Batches window, select the appropriate action. You may click Close at any time to close the Edit/Review POS Batches window.
There are four status options available. Click on the links to review Questions about Posting in the Tips and Troubleshooting to complete different processes.
Status Definition AwaitingPosting All transactions have been completed for a serving line and transactions are awaiting posting. (You may still wish to check Double Card usage and Edit/Review batches.) In Progress The system views the serving line as active and meal transactions may still be occurring or the serving line has not been closed. Skip The batch has been skipped from current posting. Transactions should be skipped if attempting to post for one day or multiple days other than the current operating day. Interrupted Network connectivity has been lost or a power outage has occurred. 
Retrieve
Batches need to be retrieved for schools that work offline or if there has been a loss of network connectivity for some reason.
- Click the Retrieve button.
Select the correct offline data path. Then, click Retrieve.
The Offline Network retrieves data that was interrupted. Computer paths (d:\, e:\, etc.) are used when creating line disks and are initially established in Administration and Maintenance → Cafeteria → Cafeterias → Settings.

- You will be informed once bathes have been successfully retrieved. Click Ok.

You should now see the retrieved batch(es) in the Edit/Review POS Batches window.
Double Card
The Double Card option allows you to check for and correct any double card usage for meals. Double card usages occur typically when there is loss of network or no network connectivity. A double card usage will appear if there are two reimbursable meals sold to one student or if an at-cost meal is sold to a student where no reimbursable meal exists.
- Click the Double Card button.
- Use the drop-down menu to Choose Meal.
- Review the double-card usages by clicking on the plus sign of each student.
- Right-click on a row and select the appropriate action.
- Edit Transaction - Allows the user to edit a transaction (e.g. The student ate two meals and one of the transactions was sold At-Cost). Refer to Edit/Review for details.
Void Transaction - Allows the user to void/remove the transaction (e.g. The Line Operator selected the wrong student from the list). Enter a comment about why you are voiding the transaction. Then, click Ok.
Fix All Warning
The Fix All button will automatically convert second reimbursable meals to at-cost meals. Only use the Fix All button if your Supervisor or Central Office contact has informed you it is okay. Permission to disable the Fix All button can be found in Administration and Maintenance → Permissions → Cafeteria Role Permissions → Transactions → "Double card usage utility; fix all"

- Click Close once you have corrected all double card usage issues.
Refresh
Refreshes the Edit/Review POS Batches window to update information. e.g. A line operator has closed a serving line after the Review Transaction option has been selected. Refreshing the window allows the closed line to appear on the screen.
Search
Allows you to search purchases through filters.
- Click the Search button.
- Enter search filters. Then, click Refresh. You may also choose the Edit Batch option. Refer to Edit/Review for details.

Customer - Use the ellipsis icon to enter customer information.
Purchase Type - Use the drop-down menu to select a meal purchase type.
Item - Use the drop-down menu to select from the list of available items.
Item Cost - Place a checkmark in the box and enter the item cost.
Meal - Select the meal(s) by placing a checkmark in the applicable box(es).
Check Number - Enter the check number.
Checks Only - Showed all checks entered.
Edit/Review
You may review transactions as well as add, edit, and remove transactions in the batch.
- Click the Edit/Review button.
- In the Edit POS Batch window, review transaction information. You may also choose to add, view/edit specific customers, or remove transactions. When you are done, click Ok.

Starting Cash - Adjust starting cash if incorrect.
Ending Cash - Click the ellipsis icon to enter figures for cash received while on the serving line.
Check Total - Enter the total amount of checks collected if incorrect.
User - The use that logged into the serving line to serve meals (Not editable).
Meal - Use the drop-down menu to select the meal type.
Date - Use the calendar tool to select a different date.
Tag - Enter information to tag edited batch information.
Line - Notes the serving line in which the transactions have occurred (Not editable).
Comments - Enter necessary comments for editing a batch.
Enter the total number of Dollar Counts, Coin Counts, and Miscellaneous Cash collected (e.g. The drawer contains 45 ($225) 5 dollar bills; Enter 45 in the Fives row). Then, click Ok.
Click Add and complete transaction information. Then, click Ok.
Customer - enter customer information. then, click Search and select the correct customer.
Payment/Adjustment - complete Payment Information by entering the value tendered and the payment type.
Cash
Check - Enter the Check # and Date.
Credit card - Click the ellipsis icon and enter card information.
Add/Remove Purchase
To add a purchase to a customer, click Add Purchase and select the item(s)/meal(s) purchased.
To remove a purchase, select the correct row from the list and click Remove Purchase.
The new transaction will appear at the end of the batch in blue text.
- Select a customer and click View/Edit to review the transaction.
- Click Edit Transaction to make changes to the customer's transaction.

- Enter a comment as to why you are editing the transaction. Then, click Ok.

- Complete necessary edits. Then, click Ok.

A new transaction is created when edits are made. The original transaction will appear with a line through it. The new transaction will appear at the end of the batch in blue text.
- Select the customer. Then click Remove.
- Enter a reason for removing/voiding the transaction. Then, click Ok.

The deleted transaction will appear with a line through it in red.
Toggle/Skip
Allows you to change the status of a batch in order to skip posting batches for a day/number of days. When you are ready to post past days, the transactions can be toggled to allow posting.
For detailed instructions on how to use the Toggle/Skip option to post one or multiple operating days, review Questions about Posting in the Tips and Troubleshooting.
- Select a batch by clicking on it. Then, click Toggle/Skip.

- Notice that the status changes from the current status to Skip. Repeat the process for additional batches that need to be skipped.

- When you are ready to post batches for the skipped batched, select the batch and click the Toggle/Skip button again so the status changes to Awaiting Posting.
- Select a batch by clicking on it. Then, click Toggle/Skip.
Remove
Removes a batch from the list such as batches containing zero transactions or where transactions have been entered a second time.
There is no UNDO when performing this operation. Make certain you wish to perform this function before proceeding.
- Select a batch by clicking on it. Then, click Remove.
- A confirmation window will appear asking if you are sure you want to delete the selected batch. Click Yes to continue with the process.

You should notice the selected batch has been removed from the list.
Real-Time Server
The Real-Time Server option allows you to review server activity at any time. You can see when communication with the server is started, when serving lines are started and stopped, and errors such as failure of network communication between POS and the back office machine.
- Locate and click on Real-Time Server from the Point-of-Sale Ribbon.
- Review Real-Time communication details. You may choose to group information such as Event Type. You may do so by dragging a header to the space at the top of the window.

Misc Income/Expenses
Some Districts utilize the miscellaneous income and expenses option in order to track operation costs through the profit/loss report. The Miscellaneous Income/Expenses option allows you to enter miscellaneous information such as trash expenses, equipment maintenance, catering, and fundraisers.
For complete information on how miscellaneous incomes and expenses reflect in the Profit/Loss Report, refer to the Setup and Use of Income and Expense Accounts document.
- Locate and click on Misc Income/Expenses.
Enter income and expense information in the last row designated by an * asterisk. You may click the ellipsis icon in order to show all entered incomes and expenses beginning at a certain date. When you are done, click Ok.
If you do not see the account listed, contact your supervisor or Central Office staff for assistance.

Account - Use the drop-down menu to select an existing income or expense account.
Date - Use the calendar tool to select the date the transaction occurred.
Type - Designated an account as expense or revenue (Not editable).
PO Number - Enter the purchase order number from the invoice (if applicable).
Comments - enter any necessary comments in regards to the income or expense.
Serving-Line Chat
The Serving Line Instant Messenger allows instant communication for site users (site supervisor, line operators, feeder school users). The instant messenger can be used from the Site Supervisor and Line Operator machines.
Locate and click on Serving-Line Chat.
Sending Chat Messages
- Click the Say button to begin a query of all available users who are currently logged in and attached to the site location.

- Choose a selected user or Broadcast/Everyone to send a message to everyone attached to the site location. The Broadcast/Everyone option is an ideal tool to covey important messages quickly. Then, click Ok.

- Enter your message in the box and click Ok.

Receiving Chat Messages
- Click on the Message Alert received through Windows alerts at the bottom of the computer screen.

- Click the Reply button to respond to messages received. Enter your reply and click Ok to send the message.

The entirety of the conversation remains in the Chat window. Those participating in the conversation are identified and time stamps are displayed.