...
...
...
...
| Section |
|---|
| Column |
|---|
| The Genovation MiniTerm 905 is a fully programmable LCD mini-terminal. The Mini Data Terminal supports simple and complex re-programmable key macros and system configurations. It includes detachable serial (RS232) and USB cables for easy setup and flexibility. The 905 has multiple card/tag reader options for fast and easy data transactions. The LCD can also be used as a customer display (pole display). Genovation's MiniTerms are ideal whenever you need to add a user interface to a machine, device or process. The possibilities are endless -- MiniTerms are right at home whether connected to PCs, printers, automation or industrial control PLC systems, cash registers or other POS terminals, electronic musical instruments, high-speed video cameras, security systems, CNC mill control and industrial pendants, access control systems and digital signage -- just to name a few. Genovation™ |
| Column |
|---|
|  Image Modified Image Modified |
|
Installation
...
| Section |
|---|
| Column |
|---|
| Step 1: Download and Install the Driver - Go to the Genovation website and scroll down to Driver/Software. Click on the latest driver.
|
| Column |
|---|
|  Image Removed Image Removed
|
|
| Section |
|---|
| Column |
|---|
| - Open the file and click Run.
|
| Column |
|---|
|  Image Removed Image Removed
|
|
| Section |
|---|
| Column |
|---|
| - It is recommended you close all other applications. When you have done so, click Next.
|
| Column |
|---|
|  Image Removed Image Removed
|
|
| Section |
|---|
| Column |
|---|
| - If you would like to save the file in a different location other than indicated, click the Browse button and set the new location. When you are done, click the Next button.
|
| Column |
|---|
|  Image Removed Image Removed
|
|
| Section |
|---|
| Column |
|---|
| - Drivers, Help Files and Test Programs should be selected for installation. This requires at least 7.2 MB of space. Click Next to continue.
|
| Column |
|---|
|  Image Removed Image Removed
|
|
| Section |
|---|
| Column |
|---|
| - If you would like to save the program shortcut in a different location other than indicated, click the Browse button and set the new location. When you are done, click the Next button.
|
| Column |
|---|
|  Image Removed Image Removed
|
|
| Section |
|---|
| Column |
|---|
| - Click the Install button to begin installing the Genovation device on your computer.
|
| Column |
|---|
|  Image Removed Image Removed
|
|
| Section |
|---|
| Column |
|---|
| The Windows command window will appear as the installation process runs. A warning may pop-up in another window asking if you are sure you wish to continue with installation. If you have downloaded the driver from the website indicated above, select to continue with installation. |
| Column |
|---|
|  Image Removed Image Removed
|
|
| Section |
|---|
| Column |
|---|
| - If you do not wish to launch the device at this point, uncheck Launch Genovation MiniTermPro. Complete the installation process by clicking Finish.
|
| Column |
|---|
|  Image Removed Image Removed
|
|
Step 2: Connect the pinpad device.
...
...
- Determine which port the scanner is using.
- Click on the Start button from your computer.
- Locate and click on the Control Panel in the menu.
| Column |
|---|
|
 Image Removed Image Removed
|
| Section |
|---|
| Column |
|---|
| - Locate the Hardware settings and click on the title.
|
| Column |
|---|
|  Image Removed Image Removed
|
|
| Section |
|---|
| Column |
|---|
| - In the Hardware and Sound window, locate Devices and Printers and click on Device Manager.
|
| Column |
|---|
|  Image Removed Image Removed
|
|
| Section |
|---|
| Column |
|---|
| - In the Device Manager window, locate Ports (COM & LPT). Click on the right-facing arrow to expand Ports and view port devices.
|
| Column |
|---|
|  Image Removed Image Removed
|
|
- Locate the Genovation device and take note of the COM number.
Step 4: Set-up the device
...
& Setup
| Note |
|---|
Drivers should be installed on the machine using the device. |
- Plug the USB into the computer.
- Establish Serving Line configurations
- Login to Newton.
- Locate and click on the Administration and Maintenance tab.
- Locate the Serving Line option in the Point-of-Sale Setup ribbon.
- Select either Serving Lines or Serving Line Configs depending on if your District uses line or a particular template. If you are unsure, check with your point of contact in the District.
 Image Modified
...
Configure the Device in Newton
...
3 includes instructions for both Serving Line and Serving Line Configs. Choose the correct section your District utilizes for setup. |
- Serving Line - Click on the Serving Line option.
...
- In the Serving-Line Maintenance window, select a cafeteria line by clicking on a row or using the drop-down arrow and click the Edit button. If you use the drop-down arrow, be sure to select the proper serving line to install the device.
| Column |
|---|
|
 Image Removed Image Removed
|
 Image Added
- Click on the Override Settings tab.
- Scroll down and locate the Devices section in the parameters.
- Once you have located the Devices section click on Customer Input Device #1, then the
...
| Column |
|---|
|
 Image Removed Image Removed
|
...
...
- ellipsis button.
 Image Added
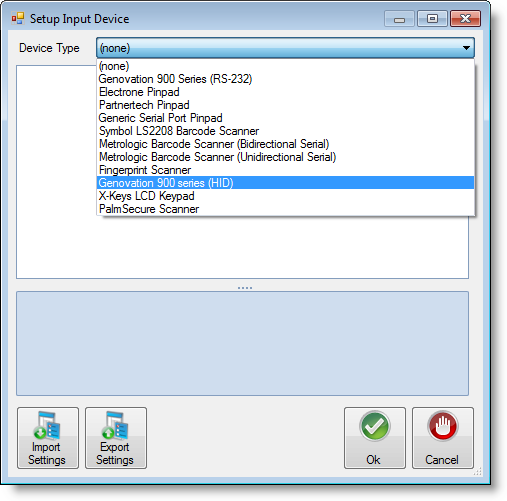
 - Use the drop-down arrow to locate and select Genovation 900 series (HID) Series.
...
...
...
 Image Removed
...
...
...
...
 Image Added
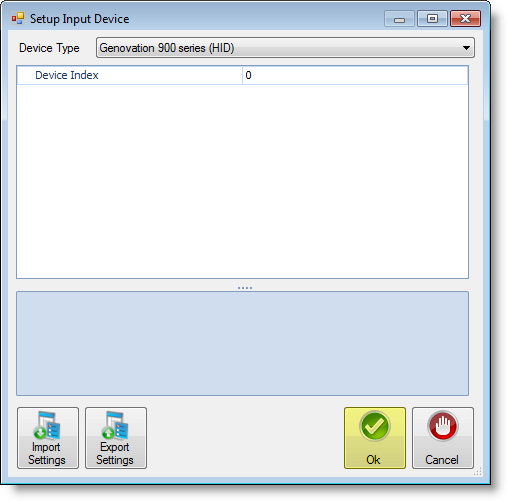
- Establish line settings - Device Index - The device index typically remains at 0.
- Click Ok when you have completed adjusting the settings.
 Image Added
 - Click Ok again to exit out of the Edit Serving Line window.
- Click Close in the Serving-Line Maintenance window.
| Column |
|---|
|
 Image Removed Image Removed
|
Use
...
- Test the pin pad device.
Test the pin pad device by starting a new meal. Ensure Newton is recognizing meals served in the system.
Return to Top
Usage
Return to Top


