| Section | |||||||||||||||
|---|---|---|---|---|---|---|---|---|---|---|---|---|---|---|---|
|
...
Installation & Setup
| Info |
|---|
Ensure you have the most recent version of Newton POS by running upgrades in AdminConsole. |
| Note |
|---|
Drivers should be installed on the machine using the device. |
...
- Click Finish to complete the installation process.
Step 3: Login to Newton and connect the fingerprint scanning device.
Step 4: Establish the biometric engine
...
| Note |
|---|
Step 6 includes instructions for both Serving Line and Serving Line Configs. Choose the correct section your District utilizes for setup. |
- Serving Line - Click on the Serving Line option.In the Serving-Line Maintenance window, select a cafeteria line by clicking on a row or using the drop-down arrow and click the Edit button. If you use the drop-down arrow, be sure to select the proper serving line to install the device.
- Click on the Override Settings tab.
- Scroll down and locate the Devices section in the parameters.
- Once you have located the Devices section click on Customer Input Device #1, then the ellipsis
- button.
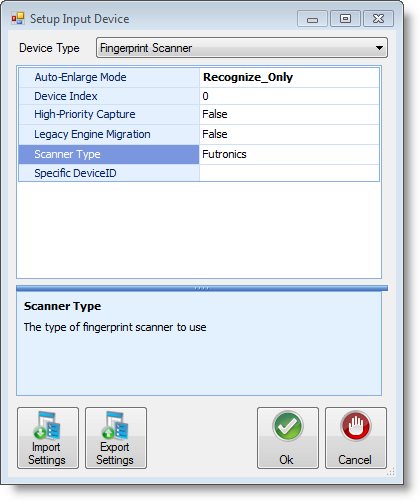
- Use the drop-down arrow to locate and select Fingerprint Scanner.
- Ensure the Scanner Type is set as Futronics. If it is not, click in the cell to use the drop-down menu and make the correct selection.
- Serving Line Configs - Click on the Serving Line Configs option.
- In the Serving-Line-Configuration Maintenance window, click the Edit button.
- Scroll down and locate the Devices section in the parameters.
- Once you have located the Devices section click on Customer Input Device #1, then the ellipsis button.
- Use the drop-down arrow to locate and select Fingerprint Scanner
- Ensure the Scanner Type is set as Futronics. If it is not, click in the cell to use the drop-down menu and make the correct selection.
Step 6: Test the fingerprint scanning device.
...


